
>>

Decadent no-bake clusters combining two kinds of chocolate, pillowy mini marshmallows, and crunchy dry-roasted peanuts — ready in under an hour.
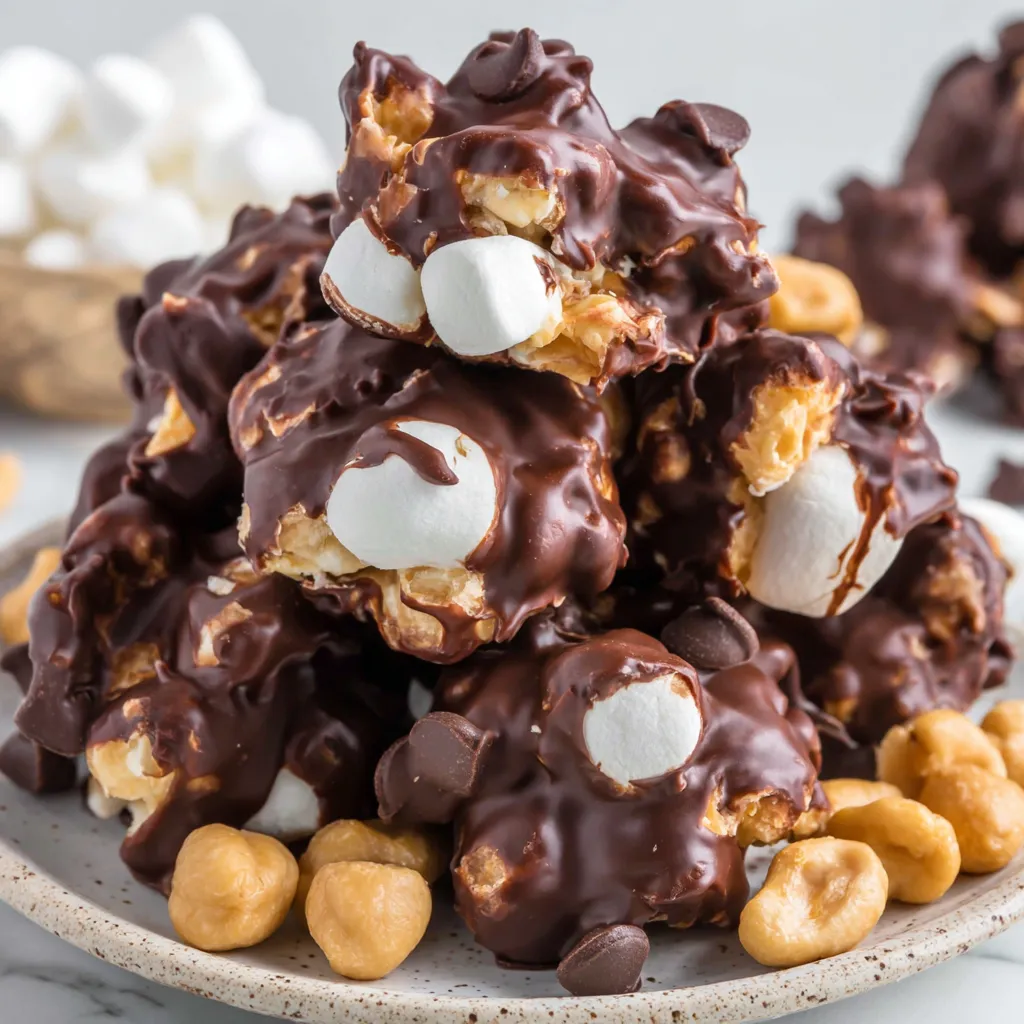
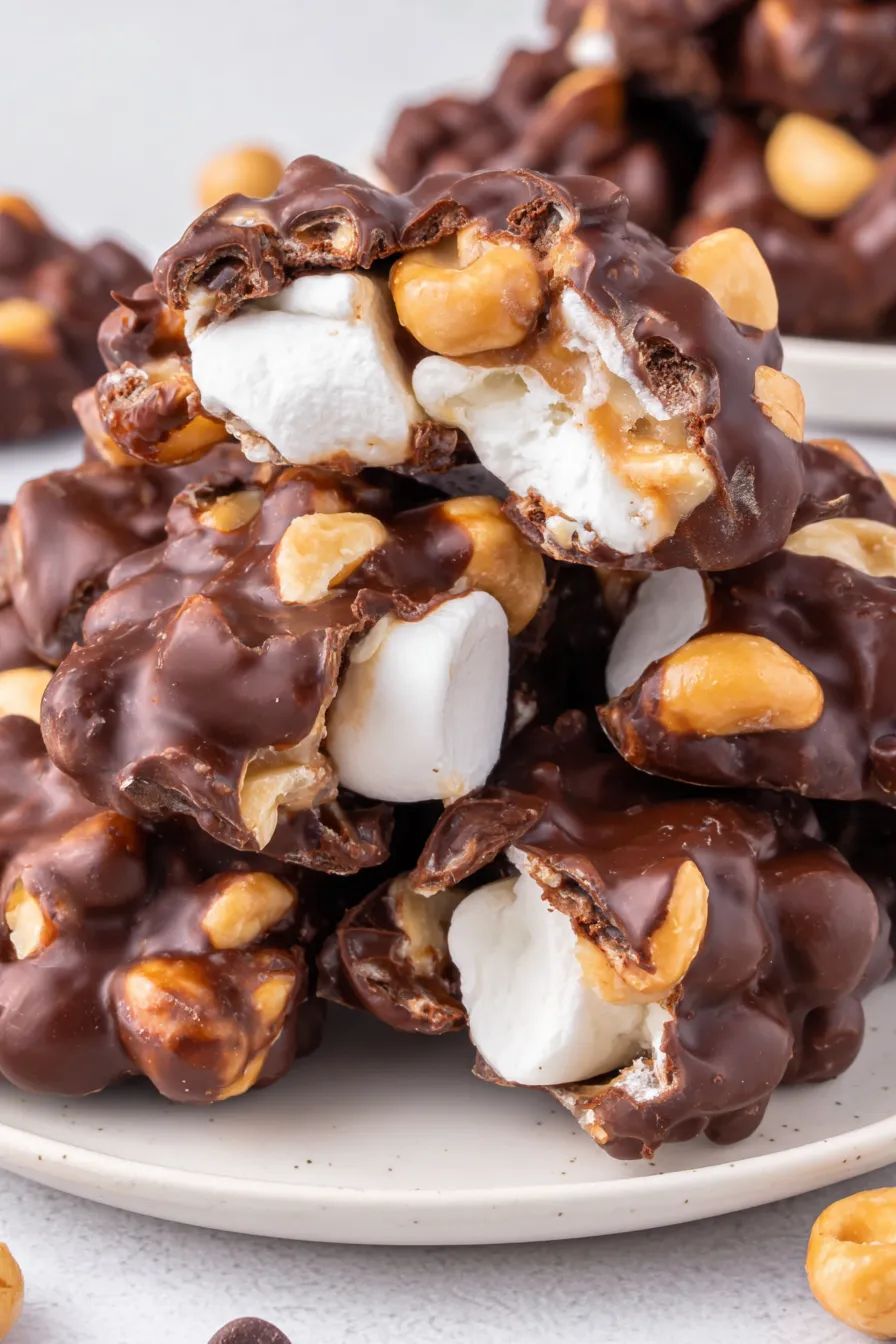
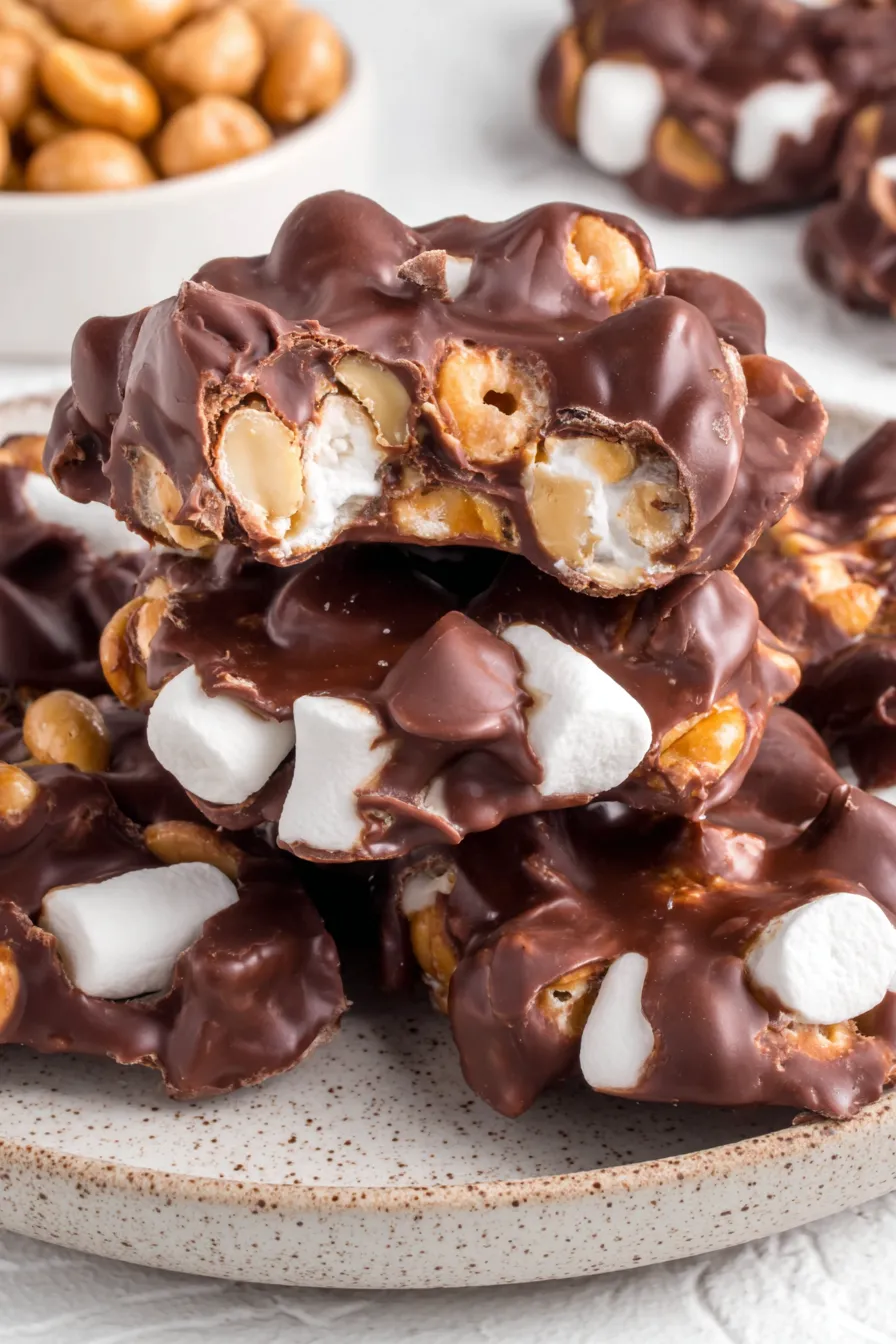
This no-bake treat is one of those joyful, small-ceremony sweets that became a holiday staple the first winter I made it. I discovered this combination when I wanted an easy, handheld candy to bring to a potluck and only had pantry basics on hand: chocolate chips, marshmallows, and a bag of cocktail peanuts. The first tray disappeared within minutes, and the recipe stuck because it balances texture and flavor so well — the glossy, slightly firm chocolate shell, the soft, chewy marshmallow interior, and the crunchy, salty peanut pieces.
What makes these clusters special is how little fuss produces such a comforting, nostalgic flavor: semi-sweet and milk chocolate braided together for depth, a touch of vegetable oil to give the coating a silky sheen, miniature marshmallows for soft contrast, and dry-roasted peanuts for that savory snap. They’re perfect for gifting in small boxes, tucking into lunchboxes, or setting on a cookie tray at a gathering. I often make a double batch when I know family will be visiting: they keep well chilled and hold their shape beautifully, so the presentation is always as satisfying as the first bite.
I remember the first time my nephew tasted one: he closed his eyes and declared them "best peanut chocolates ever," which remains my favorite review. My extended family now expects a plate of these at every holiday, and I’ve learned small tricks — like chilling the baking sheet first or using a slightly warmer chocolate — that make shaping and shine consistent batch to batch.
My favorite part is the variety of ways people eat them: some savor the marshmallow center first, others nibble around the edges to get an equal mix of chocolate and peanut. Over the years I refined timing — cool the chocolate slightly before folding in mix-ins and use a chilled baking sheet to speed setting — and these small adjustments make a big difference in texture and appearance.
Store clusters in a single layer in an airtight container with parchment between layers to prevent sticking. Refrigeration keeps them firm; they’ll hold up to 2 weeks in the fridge. For longer storage, freeze in a single layer on a tray until solid, then transfer to a sealed freezer bag. Thaw overnight in the refrigerator to avoid condensation forming on the chocolate. If you need to transport, keep them in a cool insulated bag with an ice pack to prevent melting.
Swap the dry-roasted peanuts for almonds, cashews, or pistachios for different textures and flavors; reduce added salt if using salted nuts. Replace milk chocolate chips with dark chocolate for a less sweet version or use white chocolate for a sweeter, creamier profile. Substitute mini marshmallows with chopped larger marshmallows if you don’t have minis, or try vegan marshmallows to make the recipe gelatin-free — note that traditional marshmallows contain gelatin and are not vegetarian.
Serve chilled on a decorative tray dusted with cocoa powder or finely chopped nuts. Pair with strong coffee or a creamy hot chocolate for an indulgent after-dinner offering. For party platters, make a variety with mixed nuts, some clusters dipped in additional chocolate, and others drizzled with white chocolate for visual contrast. These also work as party favors wrapped in cellophane and tied with ribbon.
Clusters like these are part of a long tradition of no-bake confections that rely on simple combinations of nuts, chocolate, and sweet binders. They echo classic American treat-board traditions where convenience and punchy flavor meet — think rocky road variations and peanut clusters often handed out during holidays. The technique of melting chocolate and folding in mix-ins is common across many regional candy-making styles because it’s forgiving and adaptable.
For winter holidays, stir in toasted pumpkin seeds, chopped candied orange peel, or a pinch of cinnamon for a seasonal twist. In summer, use roasted and salted peanuts and consider adding freeze-dried fruit pieces for brightness. For Valentine’s Day, press a single dried strawberry or a heart-shaped sprinkle on top before chilling. These small shifts keep the base method the same while tailoring flavors to the season.
Make a double batch and portion into small containers for quick grab-and-go snacks or dessert additions to packed lunches. Chill on baking sheets then transfer to labeled freezer bags for fast access; pull a batch out the night before you need them. Use a cookie scoop to make uniform portions quickly — this helps with consistent chilling time and presentation.
These clusters are an easy, reliable treat to keep on hand. They require no tempering, minimal equipment, and yield high impact with very little labor — a perfect combination for busy hosts and home bakers alike. Try making them with different nut and chocolate combinations to discover your favorite version.
Chill the baking sheet before scooping to help clusters set faster and maintain shape.
Don’t overheat chocolate; stop when a few chips remain and stir to smooth to avoid seizing.
If mixture becomes too stiff to scoop, microwave in short 10–15 second bursts and stir between each.
Use a mixture of semi-sweet and milk chocolate for balanced sweetness and a glossy finish.
Pack clusters between layers of parchment for transport to prevent sticking and smudging.
This nourishing peanut marshmallow clusters recipe is sure to be a staple in your kitchen. Enjoy every moist, high protein slice — it is perfect for breakfast or as a wholesome snack any time.
Yes. Store chilled in an airtight container for up to 2 weeks or freeze for up to 3 months. Thaw overnight in the refrigerator.
Use a 1½ tablespoon cookie scoop to make uniform clusters; if the mixture firms, warm it 10–15 seconds in the microwave and stir.
Use vegan marshmallows and dairy-free chocolate to make a vegan friendly version, though texture will vary slightly.
This Peanut Marshmallow Clusters recipe makes perfectly juicy, tender, and flavorful steak every time! Serve with potatoes and a side salad for an unforgettable dinner in under 30 minutes.
Line two baking sheets with wax paper and set aside. Chilling the sheets for 10 minutes helps speed setting when you drop the clusters.
Add both chocolate chip varieties and the vegetable oil to a large heat-safe mixing bowl. Microwave in 30-second intervals, stirring after each, until mostly melted. Remove while a few chips remain and stir until smooth to avoid overheating.
Allow chocolate to cool to lukewarm (warm to the touch but not hot). Stir in miniature marshmallows and dry-roasted peanuts until evenly coated; work quickly to preserve marshmallow texture.
Use a 1½ tablespoon cookie scoop to portion the mixture into clusters on the prepared sheets, spacing each about 2 inches apart. If the mixture firms, warm briefly and stir before scooping.
Refrigerate the clusters until completely set, about 20–30 minutes. Once firm, transfer to an airtight container and keep chilled until serving.
Last Step: Please leave a rating and comment letting us know how you liked this recipe! This helps our business to thrive and continue providing free, high-quality recipes for you.
Leave a comment & rating below or tag
@forkelle on social media!

Thick, fudgy chocolate chunk brownies crowned with gooey mini marshmallows and a quick-set chocolate frosting for an irresistible, crowd-pleasing treat.

Buttery shortbread meets a gooey, brown-sugar pecan topping in these quick pecan pie bars. Just 10 minutes to prep and perfect for sharing.

Silky, crack-free pumpkin cheesecake with warm spice, buttery graham crust, and optional caramel and rum-kissed whipped cream. Your effortless holiday showstopper.
Leave a comment & rating below or tag @forkelle on social media!
Enjoyed this recipe? Share it with friends and family, and don't forget to leave a review!
This recipe looks amazing! Can't wait to try it.
Comments are stored locally in your browser. Server comments are displayed alongside your local comments.

Join to receive our email series which contains a round-up of some of our quick and easy family favorite recipes.
