
>>

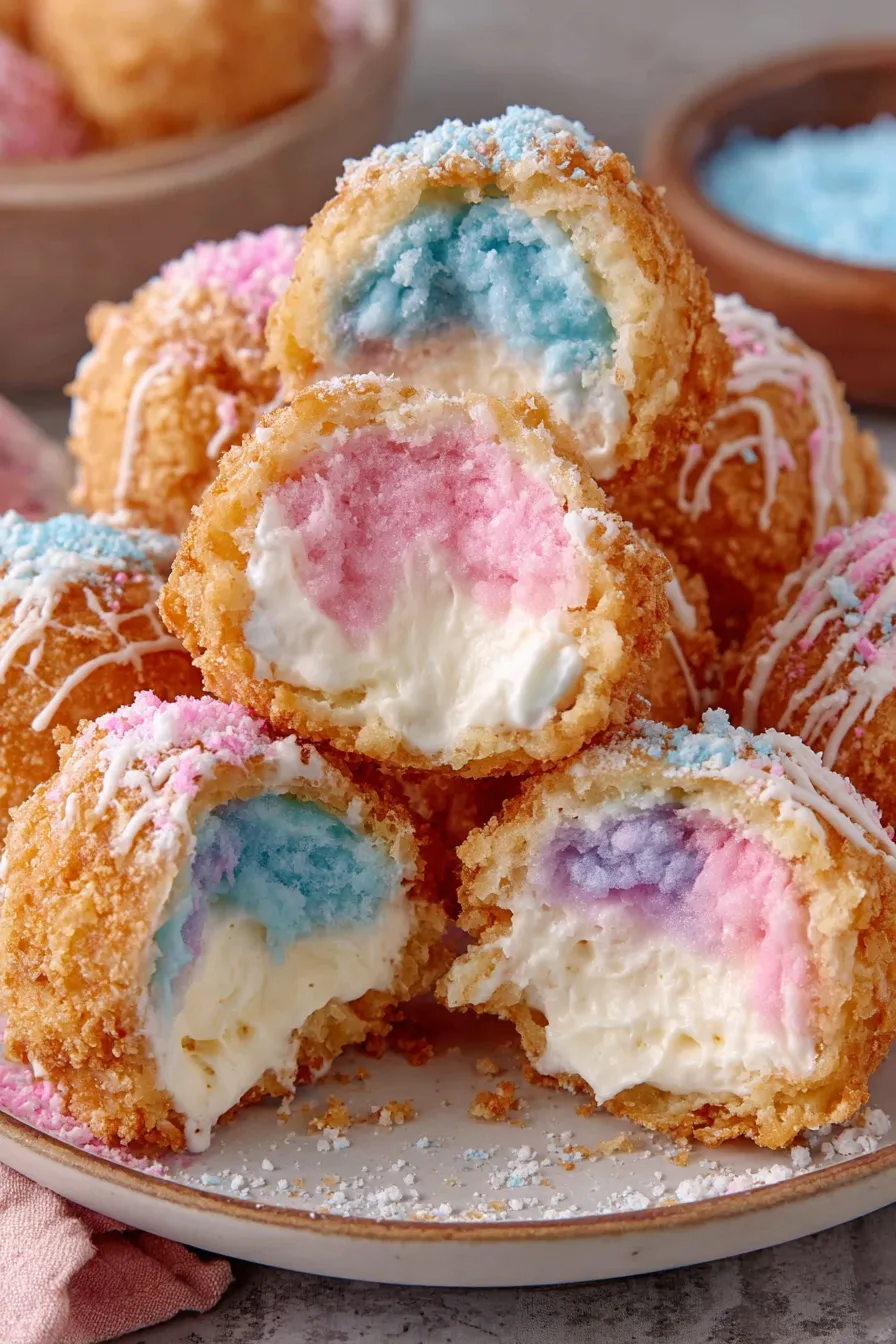
Light, fluffy cotton-candy–flavored cheesecake wrapped in golden fried dough — a carnival-worthy treat you can make at home.
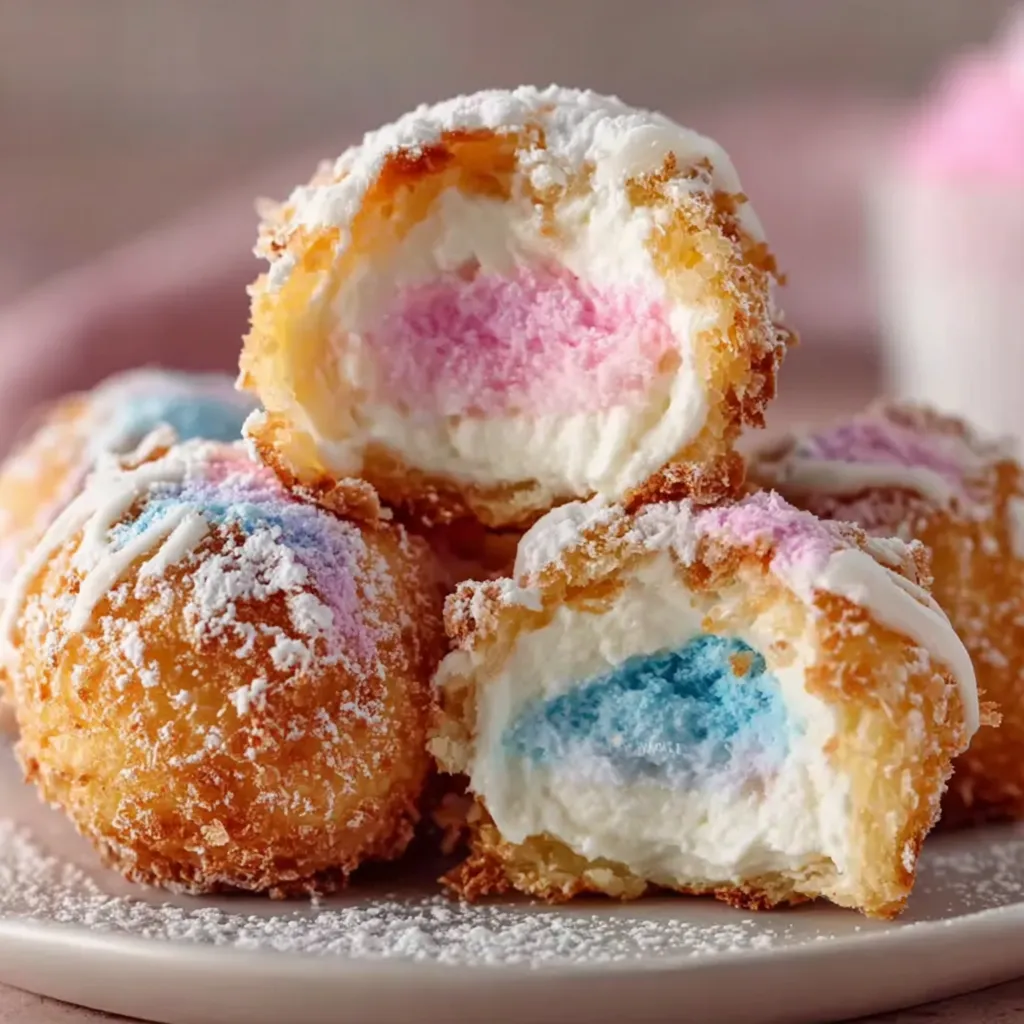
This recipe started as a playful experiment the first summer I tried to recreate the carnival feeling at home. I was chasing that airy, nostalgic cotton candy flavor and wanted it married to something creamy and familiar. The result — crispy cotton candy cheesecake bombs — combines a silk-y cheesecake filling with a warm, golden exterior that shatters into crisp flakes and releases a burst of sweet, playful flavor. I made them for a backyard party and watched neighbors and kids alike line up for seconds. The contrast between the cold, creamy center and the hot, crunchy shell is what makes these little bites so addictive.
I discovered the pairing of cotton candy extract with cream cheese during a late-night baking session when I had a forgotten jar of flavored extract and a package of refrigerated biscuits. After a few tweaks — including folding in a bit of whipped topping for lighter texture and a short chill to set the filling — these bombs became a staple for celebrations, kids' parties, and any time I want a whimsical dessert. They travel well, fry quickly, and always spark conversation. Expect sweet, slightly tangy creaminess inside, a thin, crackly fried dough shell, and the visual pop of cotton candy garnish that makes them feel special.
My family’s reactions the first time were priceless: my youngest declared them "mini clouds," and an skeptical neighbor admitted they were better than the fair. I keep a small bottle of cotton candy extract in the pantry now, just for occasions like this. Over time I've learned that a short chill and a light hand when sealing the dough prevent the filling from leaking, and that frying in small batches keeps the oil steady at 350°F for even color and crispness.
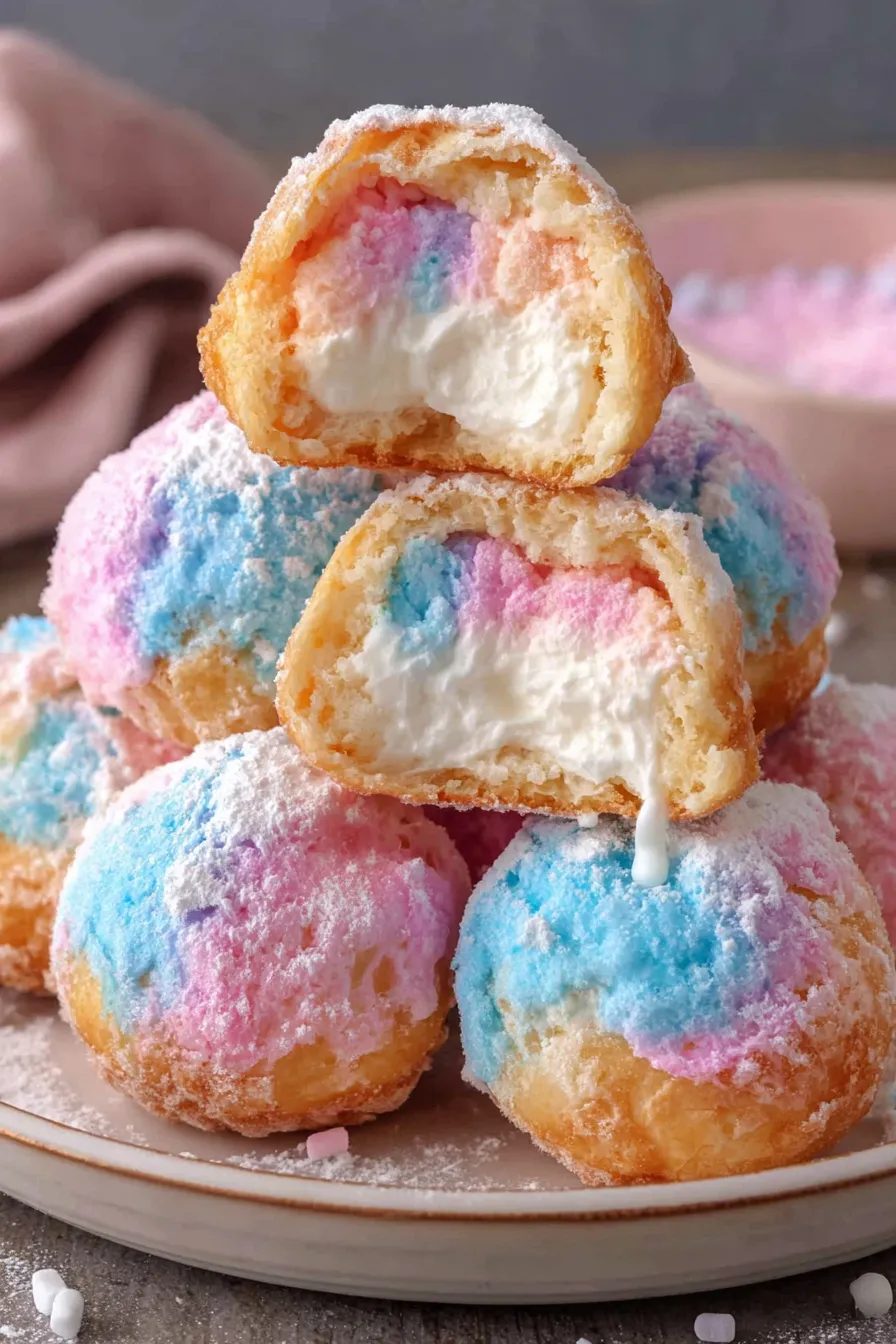
One of my favorite memories is making a double batch for a neighborhood block party; kids lined up with napkins in hand and adults kept sneaking back. The secret that most guests asked about was the chilled filling — it keeps the center intact and gives you that delightful contrast when you bite through. I also learned that a light dusting of powdered sugar immediately before serving keeps the sugar from melting into the warm dough.
Store assembled but unfried bombs on a parchment-lined tray in the freezer for up to one month; flash-freeze for 1 hour then transfer to a zip-top bag to prevent sticking. To refrigerate fried bombs, cool completely and place in a single layer in an airtight container with a paper towel to absorb moisture; consume within 48 hours. Reheat in a convection oven or toaster oven at 350°F for 5–7 minutes to restore crispness — avoid the microwave which makes them soggy. If you want to prepare ahead, make the filling and keep it chilled up to 24 hours, then assemble right before frying for best texture.
If you don’t have canned biscuit dough, substitute small rounds of pizza dough or croissant dough for a flakier shell — reduce frying time by 15–20 seconds. For a lighter filling, swap half the cream cheese for mascarpone or ricotta, though ricotta yields a grainier texture. To make dairy-free versions, use a cultured non-dairy cream cheese and coconut-based whipped topping; results vary and may be softer, so briefly chill longer before wrapping. For gluten-free options, use a gluten-free biscuit dough or wrap filling in pre-made gluten-free pastry sheets and adjust frying time carefully.
Serve these as a playful dessert course or at a dessert buffet alongside mini milkshakes, fresh berries, and a pitcher of sparkling lemonade. Garnish each piece with a small tuft of cotton candy for dramatic presentation, or skewer two on a decorative stick for a fairground-inspired display. For a more refined touch, drizzle melted white chocolate and scatter edible glitter or crushed freeze-dried fruit. They pair well with coffee or an espresso martini for adults.
These explosions of sweet nostalgia borrow from carnival and county fair traditions — fried dough and cotton candy are staples of outdoor celebrations in many countries. The idea of encasing a creamy center in fried dough echoes fried desserts like Italian zeppole and the fried cheesecake bites served in American fairs. This recipe is a modern mash-up that brings the indulgence of fairs into home kitchens, marrying two childhood favorites into a single bite-sized treat that’s both playful and comforting.
In summer, keep the garnish bright with fresh berries and a lemon-scented sugar; for autumn parties, swap cotton candy extract for maple or pumpkin spice and finish with a salted caramel drizzle. Around Valentine’s Day, tint the sugar pink and add a raspberry coulis for dipping. At winter holidays, use peppermint extract instead of cotton candy and top with crushed candy canes for a festive crunch. Small adjustments to extract and garnish can tailor these little bombs to any season or celebration.
Prepare the filling and pre-portion into tablespoon scoops on a parchment-lined tray, freeze until firm, then seal in a bag for frying later — this saves time on event day. Flatten and fill dough rounds just before frying or wrap pre-portioned frozen filling inside rounds and freeze assembled bombs. For parties, fry in multiple small batches and keep warm on a wire rack in a 200°F oven for up to 20 minutes to preserve crispness without overbrowning. Label frozen portions with date and intended cook time for consistent results.
These cotton candy cheesecake bombs are a gateway to playful entertaining — they bring a smile, require surprisingly simple technique, and reward you with dramatic textures and flavor contrasts. Make them for a crowd or keep them as a special weekend treat; either way, they invite sharing and a little bit of wonder.
Chill the filling at least 30 minutes; it firms the center and prevents leaking during frying.
Keep oil at a steady 350°F and fry in small batches to maintain even color and crispness.
Use a small cookie scoop for uniform filling portions to ensure consistent cooking.
Assemble on a chilled tray if the kitchen is warm to help maintain seals.
This nourishing crispy cotton candy cheesecake bombs recipe is sure to be a staple in your kitchen. Enjoy every moist, high protein slice — it is perfect for breakfast or as a wholesome snack any time.
This Crispy Cotton Candy Cheesecake Bombs recipe makes perfectly juicy, tender, and flavorful steak every time! Serve with potatoes and a side salad for an unforgettable dinner in under 30 minutes.
Beat softened cream cheese until smooth, add powdered sugar, vanilla, and cotton candy extract, then fold in whipped topping and heavy cream. Chill for at least 30 minutes to firm the mixture.
On a lightly floured surface, flatten each biscuit to about 1/8-inch thickness, dusting with flour as needed to prevent sticking.
Portion chilled filling into tablespoon-sized scoops, place in the center of each dough round, fold edges over, and seal tightly. Chill assembled bombs briefly if the dough warms.
Heat oil to 350°F and fry bombs in small batches for 1–2 minutes per side until golden brown. Drain on paper towels.
Roll warm bombs in the sugar mixture or dust with powdered sugar. Garnish with cotton candy or a white chocolate drizzle and serve warm.
Last Step: Please leave a rating and comment letting us know how you liked this recipe! This helps our business to thrive and continue providing free, high-quality recipes for you.
Leave a comment & rating below or tag
@forkelle on social media!

Thick, fudgy chocolate chunk brownies crowned with gooey mini marshmallows and a quick-set chocolate frosting for an irresistible, crowd-pleasing treat.

Buttery shortbread meets a gooey, brown-sugar pecan topping in these quick pecan pie bars. Just 10 minutes to prep and perfect for sharing.

Silky, crack-free pumpkin cheesecake with warm spice, buttery graham crust, and optional caramel and rum-kissed whipped cream. Your effortless holiday showstopper.
Leave a comment & rating below or tag @forkelle on social media!
Enjoyed this recipe? Share it with friends and family, and don't forget to leave a review!
This recipe looks amazing! Can't wait to try it.
Comments are stored locally in your browser. Server comments are displayed alongside your local comments.

Join to receive our email series which contains a round-up of some of our quick and easy family favorite recipes.
