
Copycat Dairy Queen Ice Cream Cake

A nostalgic, crowd-pleasing frozen cake layered with chocolate cookie crumbs, chocolate and vanilla ice cream, hot fudge and a cloudlike whipped cream frosting — a homemade knockoff of the classic Dairy Queen treat.
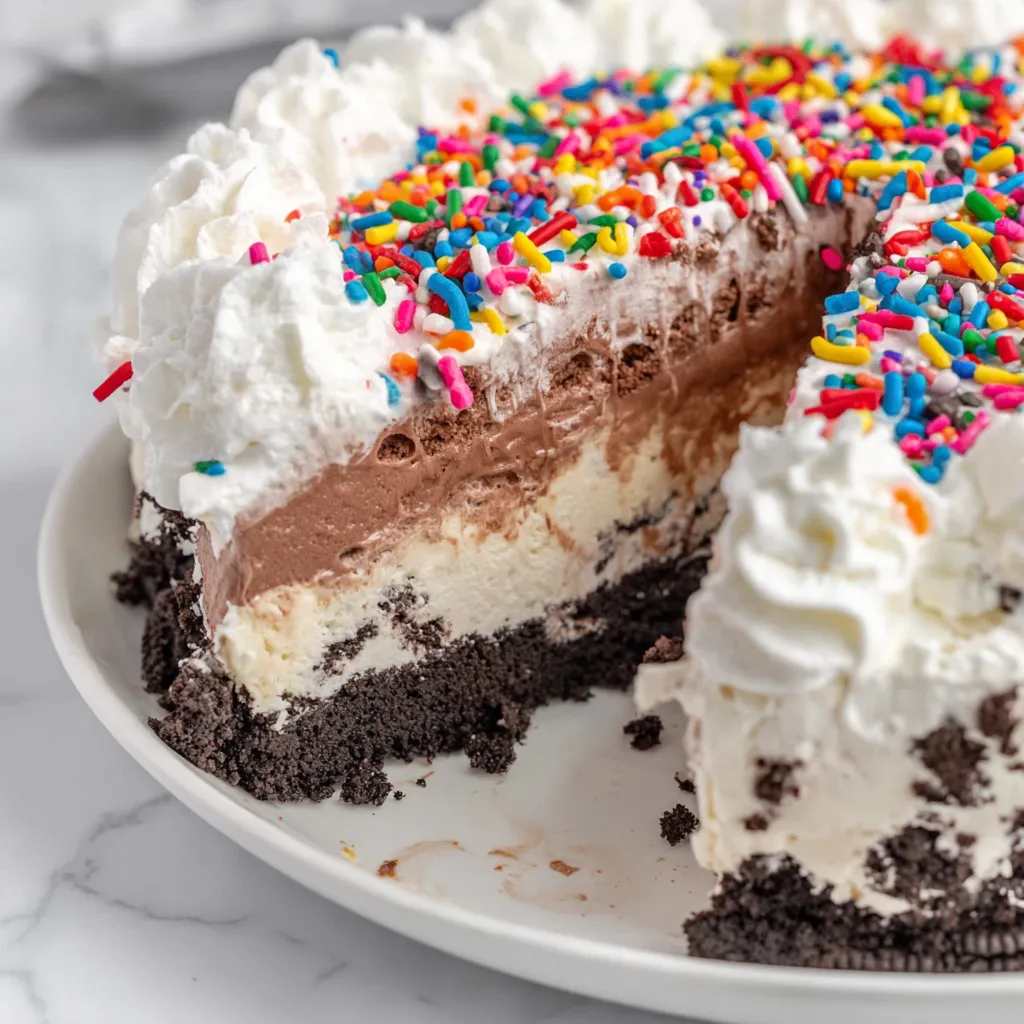
This copycat Dairy Queen ice cream cake is one of those recipes that brings people to the table with smiles before the first forkful. I first developed this version for a summer birthday when I wanted something nostalgic but easier than ordering from a shop. The layers of buttery chocolate cookie crumbs, dense chocolate ice cream, a glossy hot fudge ribbon, and light vanilla ice cream topped with pillowy whipped cream recreate the familiar sweet-salty contrast that made the original a family favorite. The texture balance — crunchy crumbs, dense frozen center, and fluffy frosting — is what makes every slice feel like a celebration.
I discovered the precise timing and assembly after a few trial runs; the breakthrough was baking the cookie crumb base briefly so it holds together without becoming hard and warming the hot fudge slightly for a smooth ribbon that won’t crack when frozen. I learned to work quickly when frosting, especially on warm days, and to use a springform pan lined with plastic wrap for an easy transfer to a serving board. This version uses common supermarket brands — Oreos or another chocolate sandwich cookie, a sturdy store-bought hot fudge, and a good quality vanilla bean ice cream — and still tastes like a professionally made frozen cake.
Why You'll Love This Recipe
- This is a make-ahead centerpiece: assemble it in under an hour of active time, then freeze for up to 24 hours for party-ready serving.
- Uses pantry staples and supermarket ice cream, so you don’t need special equipment or complicated tempering techniques.
- Offers textural contrast — crisp cookie crumbs, dense chocolate ice cream, warm-hued fudge, and light whipped cream — that delights every palate.
- Easy to scale: double the layers for a larger crowd, or make mini springform versions for individual servings.
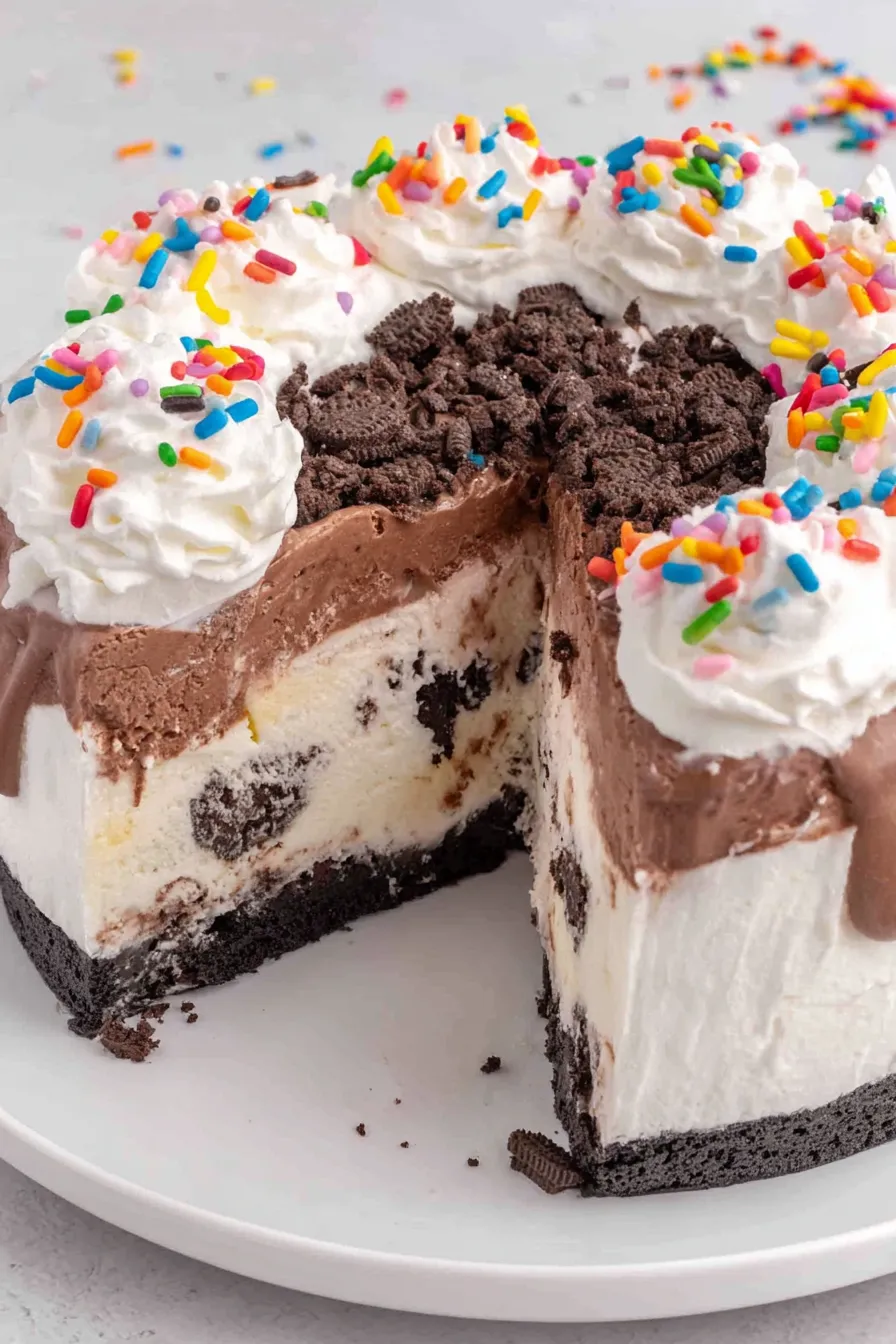
- Kid-friendly to decorate: colorful sprinkles add personality and make it perfect for birthdays and celebrations.
- Flexible on flavor swaps: use different ice cream flavors or mix-ins to suit seasonal preferences.
In my family the cake became the quick answer to “Can you bring dessert?” — even last-minute requests are possible because the active work is short and the freezing is hands-off. Neighbors and friends have told me this hits every nostalgic note and that the homemade version even improved on the original by using a more flavorful vanilla bean ice cream and a slightly crisp cookie layer.
Ingredients
- Cookie Layer: 20 chocolate sandwich cookies with the cream center (Oreos or store-brand sandwich cookies work well). The cream center helps the crumbs bind when mixed with butter and baking briefly gives a little crunch without becoming hard.
- Salted sweet cream butter: 4 tablespoons, melted. Use good-quality unsalted or lightly salted butter — Plugrá or Kerrygold give depth but any supermarket stick is fine. Melt slowly and cool slightly before mixing with crumbs.
- Chocolate ice cream: 1 quart. Choose a dense brand like Häagen-Dazs or Breyers Natural Bliss for a fudgy layer that spreads smoothly.
- Vanilla ice cream: 1 quart, preferably vanilla bean for a more pronounced vanilla flavor that shows through the whipped cream frosting.
- Hot fudge topping: 11.75 ounces (one standard jar). Smucker’s or Hershey’s hot fudge work; warm it briefly for a glossy spreadable ribbon.
- Heavy cream: 2 cups, cold. For the whipped cream frosting, use full-fat heavy cream straight from the fridge for maximum volume and stability.
- Powdered sugar: 1 1/4 cups, sifted if lumpy to keep the frosting smooth.
- Clear vanilla flavoring: 1 1/2 teaspoons. This gives a bright vanilla note without coloring the frosting; you can substitute pure vanilla extract if needed.
- Colorful sprinkles: Optional garnish. Use jimmies or nonpareils depending on the look you prefer.
Instructions
Prepare the pan and cookie crumbs: Line a 9-inch springform pan with plastic wrap so the wrap extends over the edges for easier removal later. Heat the oven to 350°F. Line a 10 by 15-inch baking sheet with parchment paper. Place 20 chocolate sandwich cookies in a food processor and blitz to fine crumbs, or crush in a sealed bag using a rolling pin. Place crumbs in a bowl and stir in 4 tablespoons melted butter until the mixture resembles damp sand. Bake the cookie crumb base: Spread the buttered crumbs in an even layer on the prepared baking sheet. Bake 7 to 8 minutes — you want the crumbs to darken slightly and the butter to set so the crumbs hold together later. Remove and cool completely on a wire rack; cooled crumbs will maintain a nice bite instead of turning soggy. Soften and spread the chocolate ice cream: Remove chocolate ice cream from the freezer and let it soften at room temperature for 15 to 20 minutes so it is pliable but not melted. Spoon the softened chocolate ice cream into the lined springform and press into an even layer. Smooth with an offset spatula, return pan to the freezer for 30 to 60 minutes to firm the layer. Warm and spread the hot fudge: Heat the hot fudge in the microwave for 20 to 25 seconds to make it pourable. Immediately spread an even layer of hot fudge over the chilled chocolate ice cream layer. Sprinkle the baked cookie crumbs evenly over the fudge. Return to the freezer for 1 hour so the fudge sets and the crumbs adhere. Top with vanilla ice cream: Allow the vanilla ice cream to soften for 15 to 20 minutes. Remove the springform pan and evenly spread the vanilla ice cream on top of the cookie crumb layer. Smooth, then return the pan to the freezer for 4 to 6 hours or preferably overnight to freeze solid. Make the whipped cream frosting: About 30 minutes before decorating, chill the mixing bowl (metal preferred) in the freezer for 30 minutes. Add 2 cups cold heavy cream, 1 1/4 cups powdered sugar, and 1 1/2 teaspoons clear vanilla flavoring to the chilled bowl. Beat on medium until sugar is incorporated, then on high until stiff peaks form, about 3 to 4 minutes. Reserve 1 cup of frosting in a piping bag fitted with a large star tip for piping the top border. Unmold and frost quickly: Work quickly if your kitchen is warm. Remove the springform outer ring, lift the cake out using the plastic wrap and transfer to a chilled serving platter. Use an offset spatula to spread the remaining whipped cream over the top and sides in a quick, even coat. Pipe a shell or swirl border with the reserved frosting and finish with colorful sprinkles. Return to the freezer until ready to serve.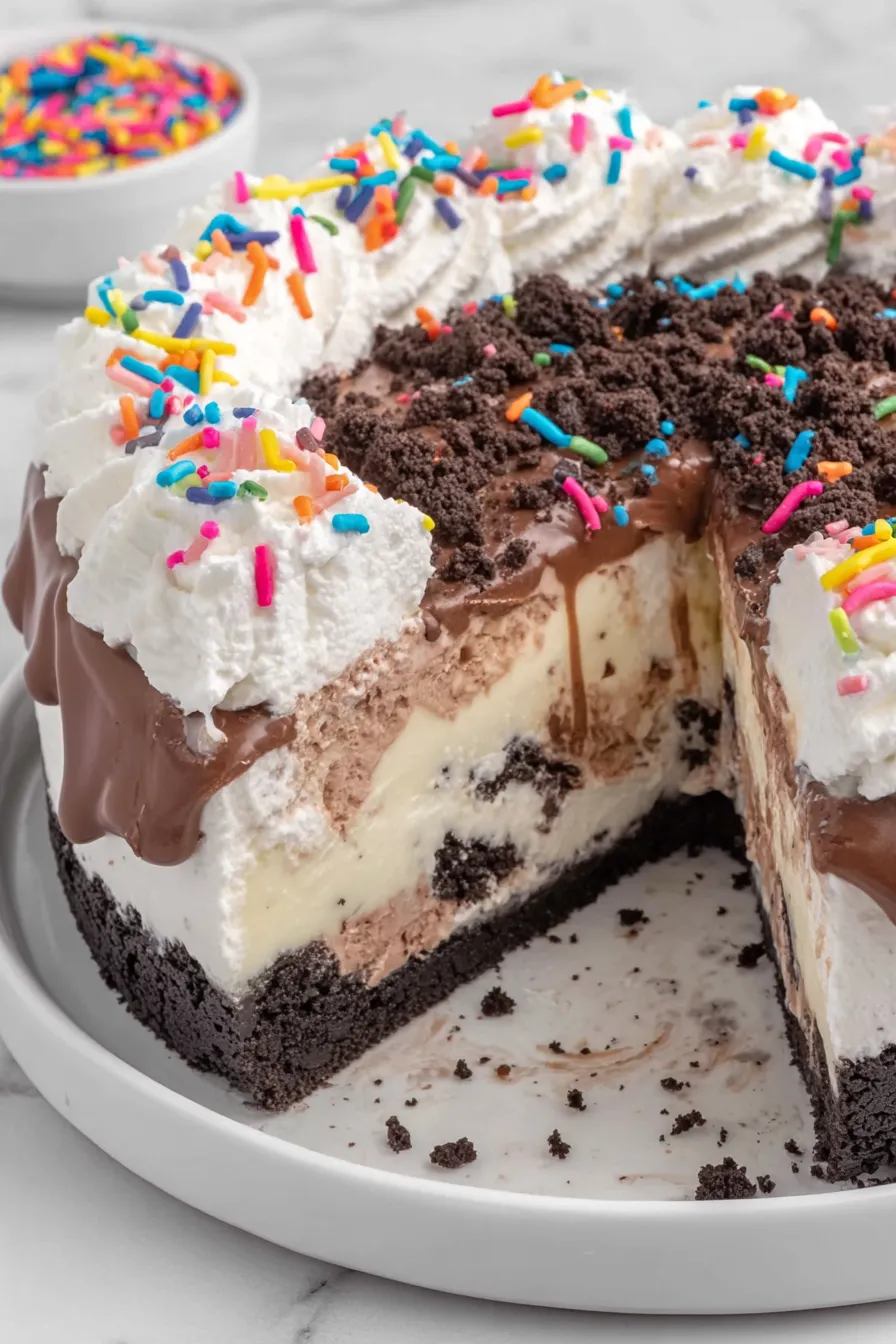
You Must Know
- The cake freezes well for up to 1 month in an airtight container; for longer storage wrap tightly with plastic and foil to avoid freezer burn.
- This dessert is high in dairy and contains gluten from sandwich cookies, so it is not suitable for dairy-free or gluten-free diets without substitutions.
- Allow 15 to 20 minutes at room temperature before slicing so the ice cream softens slightly for clean slices rather than shattering chunks.
- Use a hot knife (dip in hot water and wipe dry between strokes) to get neat slices through the frozen layers.
- If you need to move the cake, transfer it on a cake lifter or large sturdy spatula to avoid bending or cracking the sides.
My favorite part is the hot fudge ribbon; when sliced you get a molten stripe of fudge against the cold ice cream, and that contrast always earns the most comments. A neighbor once brought a slice back after a party and said it tasted like summer vacation — that memory is precisely why I keep this recipe in rotation for celebrations.
Storage Tips
Store the finished cake in the freezer covered with a cake dome or wrapped tightly in plastic wrap followed by a layer of foil to prevent odors and freezer burn. For best texture, consume within 1 week for a fresh whipped cream top; if you need to keep it up to 1 month, consider piping the decorative border just before serving and freezing the undecorated cake. Thaw at room temperature for 15 to 20 minutes before slicing. Leftover slices should be wrapped individually and placed in an airtight container for easy grab-and-go treats.
Ingredient Substitutions
If you need gluten-free, swap the sandwich cookies for a certified gluten-free chocolate sandwich cookie or make a crust using gluten-free chocolate wafers and 4 tablespoons melted butter. For dairy-free, use dairy-free ice creams and canned coconut cream whipped with powdered sugar for a stable frosting, but expect a different flavor profile. You can replace the hot fudge with salted caramel sauce for a sweeter, buttery note; warm it slightly before spreading so it sets smoothly between layers.
Serving Suggestions
Serve slices with a simple garnish of fresh berries or a drizzle of extra warm fudge. For parties, place the cake on a chilled serving board and slice with a hot, dry knife for clean edges. Pair with cold coffee or an espresso martini for adults. This cake is perfect for birthdays, summer barbecues, and celebratory gatherings where you want a dramatic, nostalgic dessert without the bakery price tag.
Cultural Background
The layered ice cream cake is a beloved American treat popularized by quick-serve chains in the late 20th century. The Dairy Queen version became a cultural staple for birthdays and graduations, known for its contrast of dense ice cream, chocolate crumb layers, and whipped frosting. Adaptations now appear in home kitchens worldwide, with each family adding substitutions and techniques that reflect regional tastes.
Seasonal Adaptations
In summer accent flavors with lemon or fruit swirls in the vanilla layer for a lighter profile. In winter try peppermint ice cream and crushed candy canes in the whipped frosting. For fall gatherings, swap the hot fudge for warm salted caramel and add toasted pecans to the cookie crumb layer for a nutty crunch that pairs beautifully with spiced ice creams.
Meal Prep Tips
Assemble the crumb layer and bake it a day ahead; store crumbs airtight. Keep ice cream tubs in the back of the freezer where temperature is most consistent. Make the whipped cream frosting just before decorating for the best volume. When transporting to events, keep the cake on a chilled board in a cooler with ice packs to maintain firmness until serving.
Every time I make this cake I’m reminded that some of the best desserts are simple combinations of dependable components assembled with care. Make it your own by swapping flavors or decorations, and enjoy sharing a slice of nostalgia.
Pro Tips
Chill the mixing bowl and beaters before whipping cream to speed up the process and improve volume.
Warm the hot fudge briefly to make spreading easier and to create a smooth ribbon that won't crack when frozen.
Work quickly when frosting the frozen cake to avoid melting the outer shell; keep the cake on a chilled board if possible.
Use a hot, dry knife for neat slices; dip in hot water and wipe dry between cuts.
Reserve a cup of frosting for piping the border so the decoration looks crisp and professional.
This nourishing copycat dairy queen ice cream cake recipe is sure to be a staple in your kitchen. Enjoy every moist, high protein slice — it is perfect for breakfast or as a wholesome snack any time.
FAQs about Recipes
How long should I let the cake sit before serving?
Yes. Remove the cake from the freezer and let it sit at room temperature for 15 to 20 minutes before slicing; use a knife warmed under hot water and wiped dry between cuts for clean slices.
How long will the cake keep in the freezer?
Store in an airtight container or wrapped first in plastic wrap and then foil to prevent freezer burn. Consume within 1 week for best whipped cream texture; up to 1 month if well wrapped.
Tags
Copycat Dairy Queen Ice Cream Cake
This Copycat Dairy Queen Ice Cream Cake recipe makes perfectly juicy, tender, and flavorful steak every time! Serve with potatoes and a side salad for an unforgettable dinner in under 30 minutes.
Ingredients
Cookie Layer
Ice Cream Layers
Hot Fudge Layer
Whipped Cream Frosting
Garnish
Instructions
Line the pan and prepare oven
Line a 9-inch springform pan with plastic wrap so the wrap overhangs the edges. Heat oven to 350°F and line a 10 x 15-inch baking sheet with parchment paper.
Make cookie crumbs
Crush 20 chocolate sandwich cookies in a food processor or sealed bag to fine crumbs. Stir in 4 tablespoons melted butter until well combined and spread evenly on the prepared baking sheet.
Bake and cool crumbs
Bake the crumbs 7 to 8 minutes until slightly darkened and fragrant. Remove and cool completely to maintain crumb texture.
Soften chocolate ice cream and layer
Let the chocolate ice cream soften 15 to 20 minutes. Spread an even layer into the lined springform pan and freeze 30 to 60 minutes to firm.
Warm and spread hot fudge
Microwave hot fudge 20 to 25 seconds to make it pourable, spread evenly over chocolate ice cream, then sprinkle the baked cookie crumbs on top. Freeze 1 hour.
Add vanilla ice cream
Allow vanilla ice cream to soften 15 to 20 minutes. Spread evenly over the cookie crumb layer and freeze 4 to 6 hours or overnight until completely firm.
Whip frosting
Chill mixing bowl 30 minutes. Beat 2 cups cold heavy cream, 1 1/4 cups powdered sugar, and 1 1/2 teaspoons clear vanilla until stiff peaks form. Reserve 1 cup for piping.
Unmold and frost
Remove outer ring, lift cake onto a platter using plastic wrap. Quickly frost sides and top with remaining whipped cream, pipe a border with reserved frosting, and add sprinkles. Return to freezer until serving.
Last Step: Please leave a rating and comment letting us know how you liked this recipe! This helps our business to thrive and continue providing free, high-quality recipes for you.
Nutrition
Did You Make This?
Leave a comment & rating below or tag
@forkelle on social media!
Categories:
You might also like...

Marshmallow Frosted Chocolate Brownies
Thick, fudgy chocolate chunk brownies crowned with gooey mini marshmallows and a quick-set chocolate frosting for an irresistible, crowd-pleasing treat.

Buttery Pecan Pie Bars
Buttery shortbread meets a gooey, brown-sugar pecan topping in these quick pecan pie bars. Just 10 minutes to prep and perfect for sharing.

Failproof Pumpkin Cheesecake
Silky, crack-free pumpkin cheesecake with warm spice, buttery graham crust, and optional caramel and rum-kissed whipped cream. Your effortless holiday showstopper.
Did You Make This?
Leave a comment & rating below or tag @forkelle on social media!
Rate This Recipe
Share This Recipe
Enjoyed this recipe? Share it with friends and family, and don't forget to leave a review!
Comments (1)
This recipe looks amazing! Can't wait to try it.
Comments are stored locally in your browser. Server comments are displayed alongside your local comments.

Hi, I'm Abigail!
What's Popular

30-Minute Meals!
Join to receive our email series which contains a round-up of some of our quick and easy family favorite recipes.