
>>

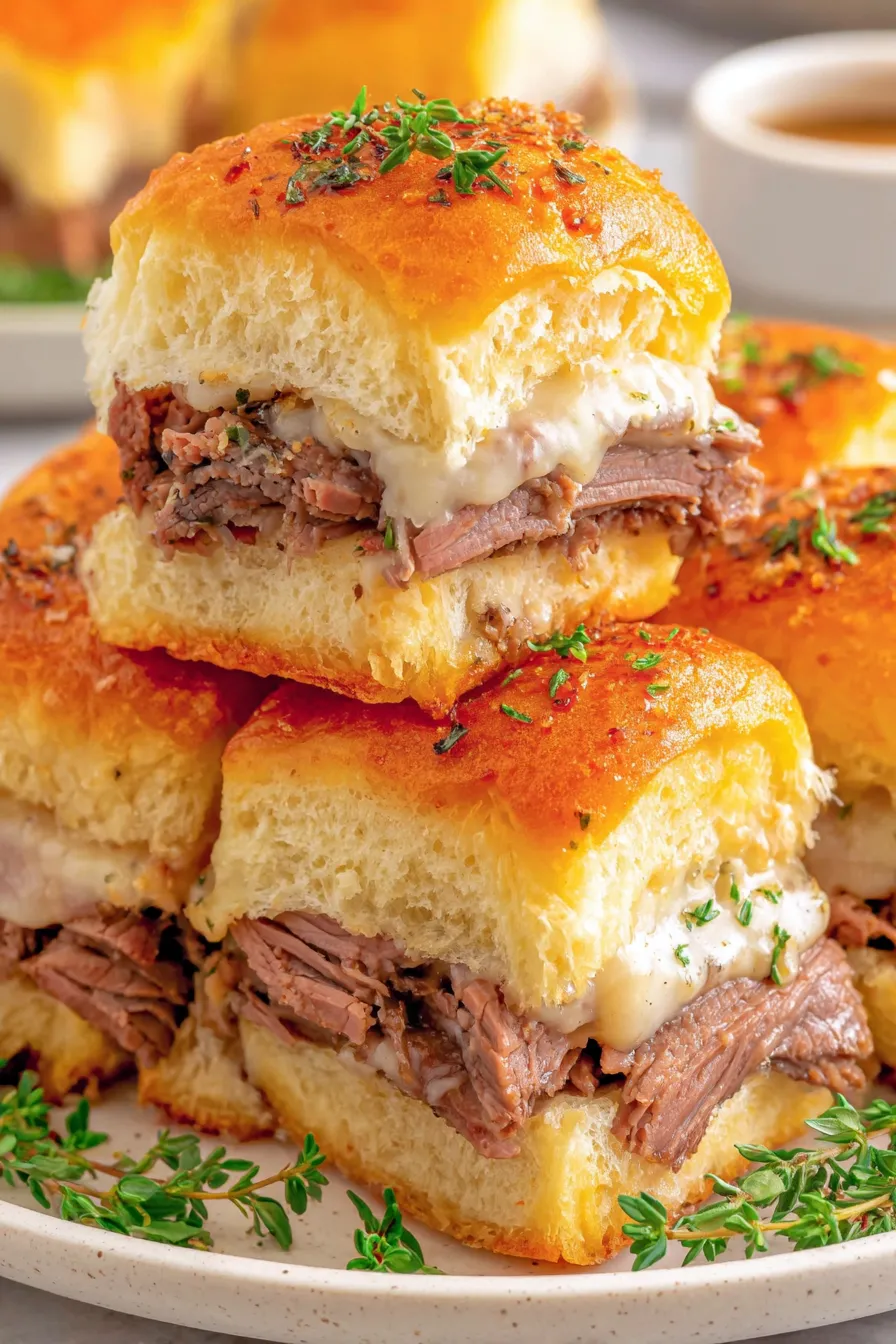
Soft Hawaiian rolls stuffed with warm deli roast beef, melty provolone, and a buttery Dijon-onion glaze — perfect for game day or a casual weeknight.

This recipe for roast beef sliders has been my go-to for casual gatherings and quick family dinners for years. I first put it together when I needed an easy crowd-pleaser for a last-minute potluck; the combination of buttery Hawaiian rolls, warm deli roast beef, and gooey provolone was an instant hit. The flavors are simple but layered: the sweet, slightly tangy rolls, the savory beef warmed in a light beef broth, and the bright Dijon-onion butter brushed over the top. Every time I serve these, someone asks for the recipe.
I love how forgiving and fast these are. The technique is straightforward — warm the beef in broth so it stays juicy, layer with cheese, and bake under foil so the cheese melts evenly. The final uncovered bake briefly crisps the tops to a golden finish. They’re great for busy weeknights when you want something comforting without a lot of fuss, and they travel well for picnics and potlucks. The sliders hold up to small tweaks — swap the cheese, add caramelized onions, or use different rolls — and still taste great.
When I brought these to a family reunion, they disappeared within minutes — especially popular with kids and adults who appreciate the melty cheese and buttery top. I discovered a simple trick early on: warming the roast beef briefly in beef broth keeps it moist and flavorful without overcooking. That little step truly elevates the finished sandwich.

My favorite part of these sliders is the buttery top that crisps up in the final bake — it adds a bakery-like finish that makes a simple sandwich feel special. Over the years I’ve learned that tipping the balance toward quality basic ingredients (good rolls, thinly sliced roast beef, and real butter) yields the most satisfying results even with minimal prep.
To keep the sliders at their best, cool them slightly and store in an airtight container in the refrigerator for up to 3 days. For longer storage, wrap the entire pan tightly in foil and then plastic wrap, and freeze for up to 3 months. Reheat frozen sliders in a 350°F oven for 15–20 minutes still wrapped to maintain moisture, then unwrap and broil briefly if you want to refresh the crisped top.
If you’re avoiding dairy, use a plant-based butter and a dairy-free melting slice. For gluten-free, swap the Hawaiian rolls for gluten-free slider buns (note the change in texture). If you’d like more bite, replace provolone with sharp cheddar or pepper jack. To deepen flavor, add caramelized onions or a smear of horseradish sauce before topping the meat.
Serve these with a simple coleslaw, dill pickles, or a crisp green salad to cut through the richness. They’re excellent alongside baked potato wedges, kettle chips, or a bowl of soup on the side. For a party, arrange sliders on a platter garnished with fresh parsley and serve with a side of au jus or warmed beef gravy for dipping.
Miniature sandwiches like these have roots in American party food traditions — small, shareable bites that are easy to scale. Hawaiian rolls were popularized in casual American baking and have become a favored base for sliders because of their soft crumb and slightly sweet flavor, which pairs well with savory fillings like roast beef and cheese.
In cooler months, add a layer of caramelized onions and a spoonful of grainy mustard for warmth. In summer, lighten the sliders with arugula and a tangy gremolata on the side to brighten the overall profile. Holiday variations can include cranberry chutney and brie instead of provolone for a festive twist.
Assemble the pan the night before and refrigerate uncovered for up to 12 hours, then brush with the butter glaze and bake just before serving. For grab-and-go lunches, slice into individual sliders and wrap each in parchment; store in the fridge and reheat briefly in a toaster oven.
These roast beef sliders are comfort food with a bit of polish — easy to make, endlessly adaptable, and reliably popular. Whether you’re feeding a crowd or making a cozy family meal, they’re one of those dishes that almost always bring smiles and seconds. Make them your own with small tweaks and enjoy sharing them with friends and family.
Warm the roast beef briefly in simmering broth to keep it moist — avoid overcooking the slices.
Brush the tops thoroughly with the butter-Dijon mixture to ensure an evenly browned and flavorful crust.
Cover the pan while baking to melt the cheese evenly, then uncover for a short time to achieve a golden top.
If making ahead, assemble and refrigerate unbaked for up to 12 hours; bake just before serving for best texture.
This nourishing classic roast beef sliders recipe is sure to be a staple in your kitchen. Enjoy every moist, high protein slice — it is perfect for breakfast or as a wholesome snack any time.
Yes. Assemble the sliders, wrap tightly, and freeze for up to 3 months. Thaw overnight before reheating in a 350°F oven until warmed through.
Use low-sodium beef broth and reduced-sodium cheese, and reduce or omit the salt in the butter glaze to lower sodium.
This Classic Roast Beef Sliders recipe makes perfectly juicy, tender, and flavorful steak every time! Serve with potatoes and a side salad for an unforgettable dinner in under 30 minutes.
Preheat oven to 375°F and lightly spray a 9×13-inch baking dish with nonstick spray. Prepare foil by lightly spraying to prevent sticking when covering the pan.
Pour 2 cups low-sodium beef broth into a large skillet and bring to a gentle simmer over medium heat for about 5 minutes. Avoid boiling hard to prevent rapid reduction.
Add 1 pound deli-sliced roast beef to the simmering broth and stir until warmed through, about 1–2 minutes. Drain excess broth before assembling to prevent sogginess.
Place bottom halves of 12 Hawaiian rolls in the baking dish cut-side up. Arrange 6 slices of provolone across the bottoms, add warmed roast beef, then top with remaining 6 slices of provolone and place roll tops over the stack.
Whisk together 1/2 cup melted salted butter, 1/2 tablespoon Dijon mustard, 1 teaspoon dried onion flakes, and 1/2 teaspoon garlic powder. Brush the mixture evenly over the tops of the rolls.
Cover the pan with nonstick foil and bake at 375°F for 20 minutes to melt cheese. Remove foil and bake an additional 5 minutes until the tops are golden brown. Let rest 2–3 minutes, then cut into individual sliders.
Last Step: Please leave a rating and comment letting us know how you liked this recipe! This helps our business to thrive and continue providing free, high-quality recipes for you.
Leave a comment & rating below or tag
@forkelle on social media!

Thick, fudgy chocolate chunk brownies crowned with gooey mini marshmallows and a quick-set chocolate frosting for an irresistible, crowd-pleasing treat.

Buttery shortbread meets a gooey, brown-sugar pecan topping in these quick pecan pie bars. Just 10 minutes to prep and perfect for sharing.

Silky, crack-free pumpkin cheesecake with warm spice, buttery graham crust, and optional caramel and rum-kissed whipped cream. Your effortless holiday showstopper.
Leave a comment & rating below or tag @forkelle on social media!
Enjoyed this recipe? Share it with friends and family, and don't forget to leave a review!
This recipe looks amazing! Can't wait to try it.
Comments are stored locally in your browser. Server comments are displayed alongside your local comments.

Join to receive our email series which contains a round-up of some of our quick and easy family favorite recipes.
