Christmas Red Velvet Poke Cake - Easy Holiday Dessert
30-MINUTE MEALS! Get the email series now
Royal Recipe

Christmas Red Velvet Poke Cake

5 from 1 vote
1 Comments
Abigail Claire
By: Abigail ClaireUpdated: Jul 18, 2026
This post may contain affiliate links. Please read our disclosure policy.

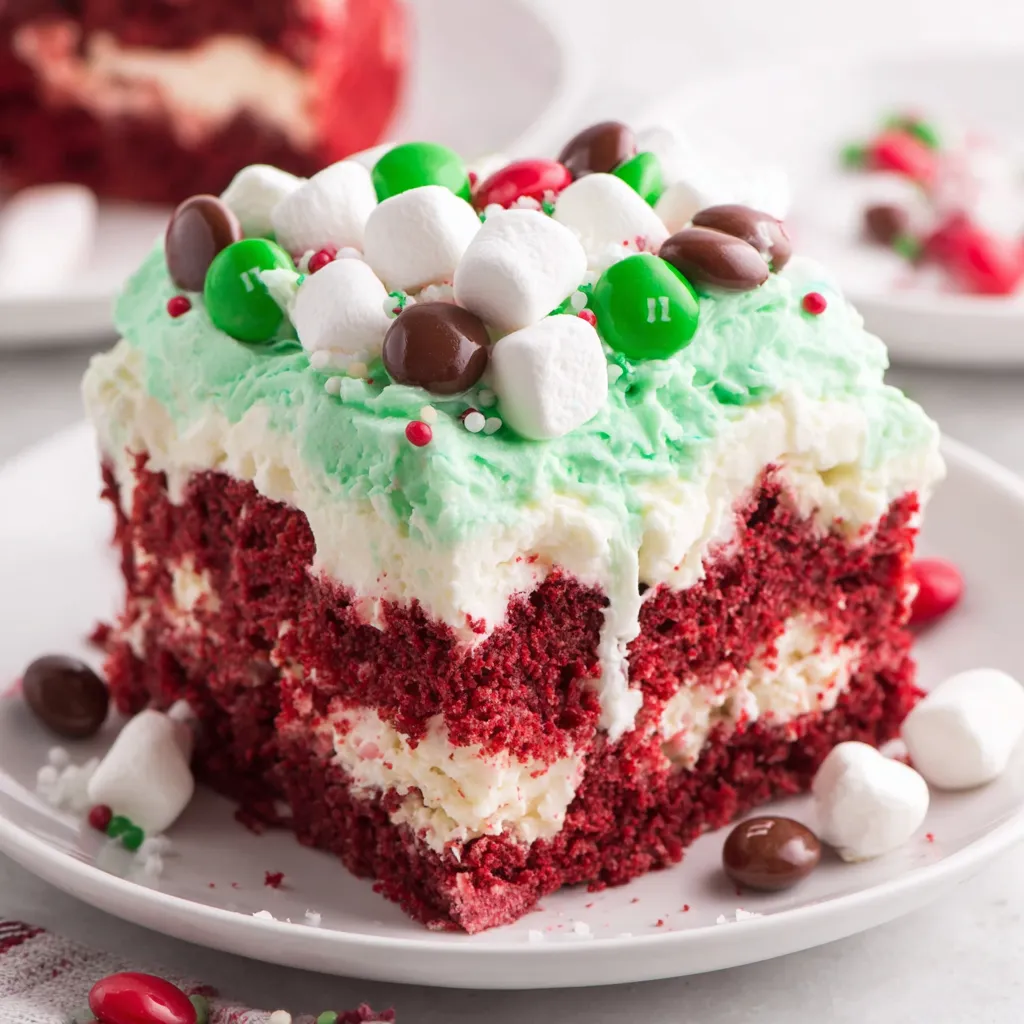
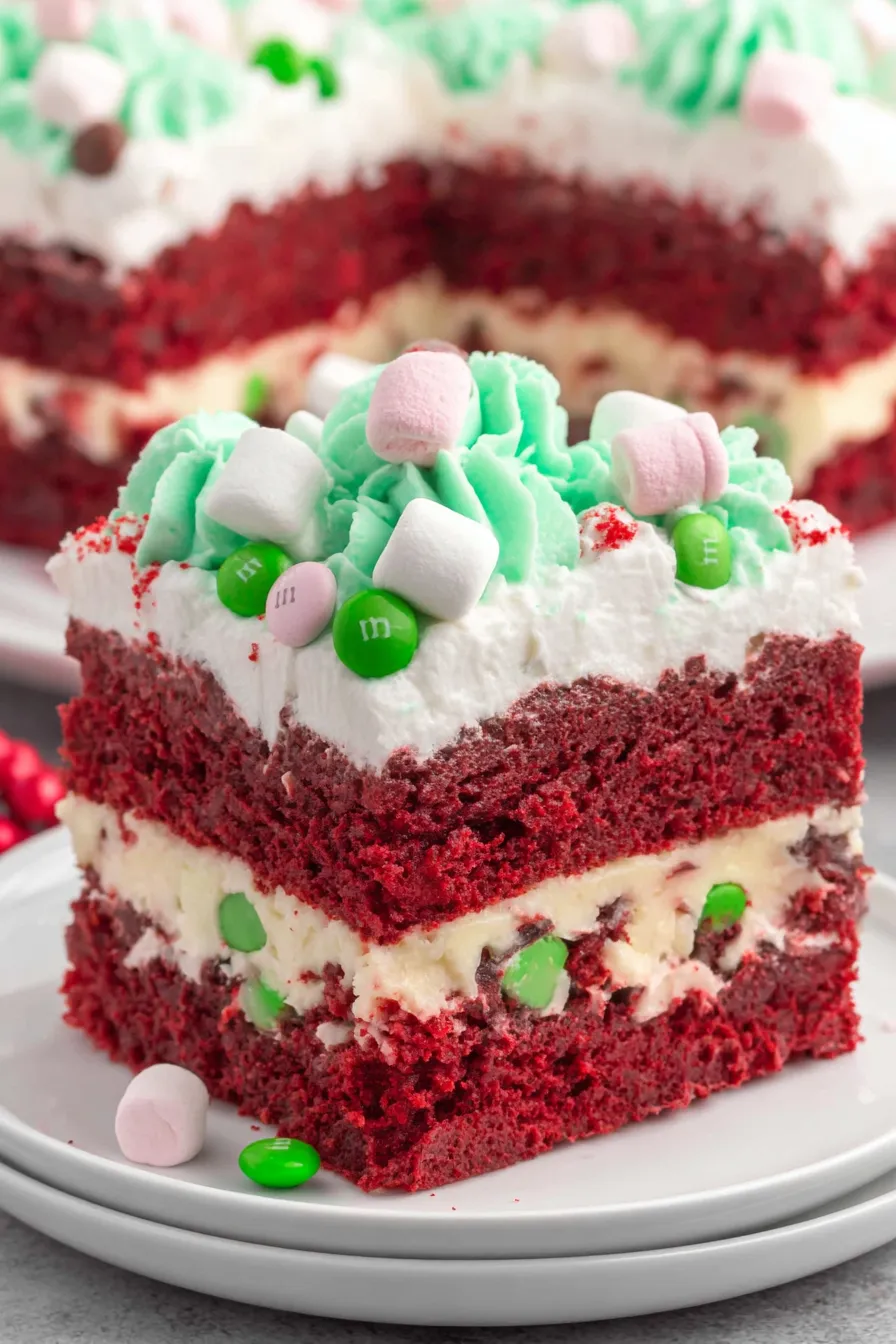
A festive, no-fuss red velvet poke cake layered with cheesecake pudding, green-tinted whipped topping, marshmallows and red and green M&M's — perfect for holiday gatherings.
Christmas Red Velvet Poke Cake
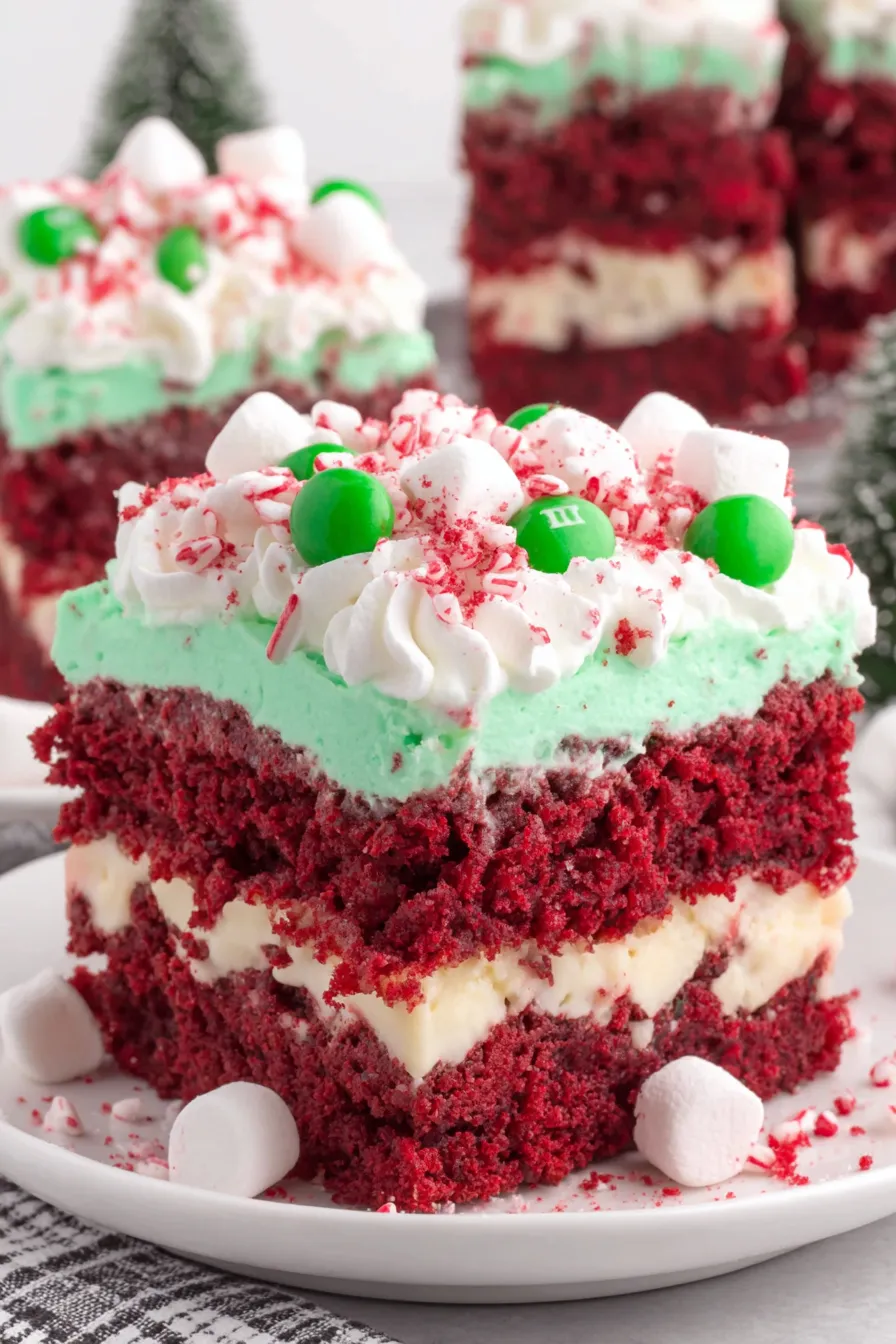
This Christmas Red Velvet Poke Cake is the kind of dessert that turns a busy holiday kitchen into a place of magic. I first made this version on a December afternoon when I needed an easy show-stopping dessert for an impromptu cookie swap. The bright crimson base, silky cheesecake pudding infused into the cake, and a cloud of green-tinted whipped topping studded with marshmallows and candies made every neighbor stop and ask for the recipe. It’s sturdy enough to make ahead, yet delicate in mouthfeel: the cake remains tender while pockets of pudding create creamy ribbons with every bite. I love this as a last-minute centerpiece because the technique is forgiving — a boxed mix and instant pudding make it quick, while the decoration provides a handcrafted, festive look. The texture contrast is the best part: a soft red velvet crumb, pockets of cooled cheesecake pudding, and a light, airy whipped topping with a little crunch from M&M’s and sprinkles. Every time I bring this to a holiday get-together, it disappears first, and children and adults alike come back for seconds.

Why You'll Love This Recipe

  • Makes a large 9x13 crowd-pleaser that serves about twelve squares — ideal for potlucks and holiday parties.
  • Uses pantry-friendly boxed cake mix and instant pudding for a fast 45-minute active time, plus chilling.
  • Poke technique gives creamy pockets of flavor without extra complicated steps or layers to assemble.
  • Decorations are customizable: swap the candies for seasonal colors, toasted coconut, or crushed peppermint.
  • Can be prepared the day before; chilling firms the pudding for clean slices and easier transport.
  • Kid-friendly decorating step makes this a great project to do with children the week of Christmas.

In my kitchen this has been a go-to for five holiday seasons. One year I made three for different family events; one cake survived barely two hours at my sister’s gathering. Guests always comment on the cheesecake flavor peeking through the red velvet and how the green whipped topping looks festive without being over-the-top. It’s practical, pretty, and reliably delicious.
Ingredients

  • Red velvet cake mix (15.25 oz box): A standard boxed mix saves time and gives a consistent red crumb; I like Duncan Hines or Pillsbury for reliable texture.
  • Water (1 1/4 cups): Use room-temperature water as directed on the box to hydrate the batter without shocking the leavening agents.
  • Vegetable oil (1/2 cup): Neutral-flavored oil keeps the crumb tender and moist; can substitute canola if preferred.
  • Large eggs (3): Bring to room temperature for better volume and even mixing; large eggs are assumed for boxed mixes.
  • Cold whole milk (3 3/4 cups): For the pudding layer, whole milk gives the creamiest result; measure precisely for correct pudding set.
  • Cheesecake-flavored instant pudding mix (6.8 oz): Two 3.4-oz packets blended into the milk create a thick, tangy layer that soaks into the cake.
  • Whipped topping (16 oz thawed): Two 8-oz tubs of thawed whipped topping keep the finish light; non-dairy whipped topping works but flavor will differ slightly.
  • Green food coloring (10–12 drops): Gel or liquid both work; start with fewer drops and build to the shade you want.
  • Mini marshmallows (3 cups): Small marshmallows add chew and holiday charm; use mini for even coverage.
  • Red M&M’s (1/4 cup) and green M&M’s (1/4 cup): Use candy-coated chocolate for crunch and color contrast; substitute red candies if preferred.
  • Red sprinkles (for garnish): A small spoonful scattered on top adds sparkle and a festive finish.

Instructions

Prepare the pan and batter: Preheat the oven to 350°F. Spray a 9x13-inch pan thoroughly with baker’s spray for easy release. In a medium mixing bowl, combine the red velvet cake mix, 1 1/4 cups water, 1/2 cup vegetable oil, and 3 large eggs. Beat at medium speed with a handheld mixer for about 2 minutes until smooth and slightly aerated; scrape the bowl once to ensure even mixing. Bake until set: Pour the batter into the prepared pan and smooth the top. Bake on the center rack for about 25 minutes or until a toothpick inserted near the center comes out with a few moist crumbs. Visual cue: the edges will start to pull away slightly from the pan and the cake’s surface will spring back when gently pressed. Poke and cool: Remove the cake and let it sit 5 minutes. Using the rounded handle of a wooden spoon, press holes about 1/2 inch apart across the surface while the cake is still warm; this allows the pudding to seep in. Allow the cake to cool to room temperature before adding pudding so you don’t thin the pudding layer. Make and pour the pudding: In a medium bowl whisk together 3 3/4 cups cold whole milk and the 6.8-ounce cheesecake instant pudding mix for 1 to 1 1/2 minutes until it just begins to thicken. Pour the pudding evenly over the prepared cake, working quickly to fill the holes. Use a spatula to gently smooth the surface without disturbing the holes. Chill to set: Tightly cover the pan with plastic wrap and refrigerate for at least 4 hours, or overnight for cleaner slices and fuller flavor. The pudding will firm and the cake will absorb some moisture, creating creamy pockets in the crumb. Tint, top and decorate: Stir 10–12 drops of green food coloring into 16 ounces of thawed whipped topping until color is uniform. Spread the tinted topping evenly over the chilled pudding layer. Scatter 3 cups mini marshmallows, then the red and green M&M’s, and finish with red sprinkles. Chill briefly if needed to set the decoration before slicing into twelve 3-inch squares. User provided content image 1

You Must Know

  • High in festive appeal: the cake is visually striking and is ideal for holiday tables where presentation matters.
  • Make-ahead friendly: the dessert benefits from chilling and can be assembled up to 24 hours in advance for best results.
  • Storage: keep refrigerated up to 3 days in an airtight container; freezing is not recommended for decorated slices.
  • Allergens: contains eggs, dairy and gluten; marshmallows may include gelatin which is not vegetarian-friendly.
  • Texture tip: if the pudding seems runny, whisk it a bit longer and chill briefly before pouring to avoid overly thin pockets.

What I adore about this dessert is how simple ingredients become celebratory with a single color swap and a few playful toppings. My children coated the top with M&M’s one year and insisted on arranging them into a wreath shape; their pride in the decoration was as sweet as the cake itself. For busy hosts, the ability to prepare the day before means less last-minute stress and more time enjoying holidays with family.
User provided content image 2

Storage Tips

Store leftovers in the refrigerator covered tightly with plastic wrap or in an airtight container for up to three days. For transport, cover loosely with foil and keep chilled; store in a cooler if traveling more than an hour. Avoid freezing the decorated cake—the whipped topping and candies change texture when thawed. If you must freeze, remove decorations, freeze the plain pudding-topped cake wrapped in plastic and foil for up to one month, then thaw overnight in the fridge before adding fresh whipped topping and decorations.

Ingredient Substitutions

Want to adapt ingredients? Use a from-scratch red velvet batter if you prefer—just ensure your home recipe yields a single 9x13 pan and bake time is similar. For a lighter finish, swap whipped topping for stabilized whipped cream (whip heavy cream with 1–2 tbsp powdered sugar and 1 tsp vanilla, add 1 tsp gelatin dissolved in water if you need sturdiness). Use fat-free milk with lower-setting pudding if you prefer less richness, but expect a slightly softer set. For a vegetarian option, choose marshmallows labeled gelatin-free and ensure candies are suitable.

Serving Suggestions

Serve chilled squares on a platter garnished with extra sprinkles or a dusting of powdered sugar. Pair with coffee, spiced cider or a glass of milk for kids. For an adult dessert, add a small scoop of vanilla bean ice cream alongside each square or drizzle a spoonful of room-temperature raspberry sauce to cut the sweetness. I like placing a few mint leaves near the corners for contrast and aroma when presenting to guests.

Cultural Background

Red velvet has deep roots in American baking, with popularity rising in the early 20th century thanks to cocoa chemistry and a long association with Southern tea cakes. The characteristic red hue came from reactions between natural cocoa and acidic ingredients, and later intensified with red food coloring for dramatic holiday presentation. The poke-cake method itself is a modern shortcut—pouring filling into holes to create an infused, layered sensation without multiple bakes or complex pastry work.

Seasonal Adaptations

Switch toppings to match seasons: for Valentine’s Day use pink and white candies, for St. Patrick’s Day use green sprinkles and shamrock-shaped candy, or for a winter wedding use silver dragees with white mini marshmallows. In autumn, swap the cheesecake pudding for pumpkin spice instant pudding and top with chopped pecans and caramel drizzle. The base technique remains the same: bake, poke, pour, chill, and decorate to match the season.

Meal Prep Tips

Prepare the cake and pudding layer the day before, then chill overnight so the pudding fully sets and the cake is easy to slice. Store decorations separately in zip-top bags and top the cake just before serving if you need pristine presentation. Use a sharp chef’s knife wiped between cuts for clean 3-inch squares. Label the pan with baking time and date if freezing an undecorated version to keep track during busy holiday weeks.

This cake has brought more than sweetness to my holidays—it has provided simple rituals, like kids choosing candy colors and my sister insisting we always bake early to enjoy the process. Give it a try and make the decorations your family’s signature this season; that small personal touch is what makes shared food so memorable.

Pro Tips

  • Allow the cake to cool slightly before poking holes to prevent tearing the crumb.

  • Whisk pudding until it begins to thicken; over-whisking can lead to a dryer set.

  • Chill the assembled pan at least 4 hours, ideally overnight, for clean slices.

  • Use a rounded wooden spoon handle for evenly sized holes that allow pudding to sink in.

This nourishing christmas red velvet poke cake recipe is sure to be a staple in your kitchen. Enjoy every moist, high protein slice — it is perfect for breakfast or as a wholesome snack any time.

Tags

Sweet TreatsChristmas DessertRed VelvetPoke CakeHoliday BakingCheesecake PuddingFestive Desserts
No ratings yet

Christmas Red Velvet Poke Cake

This Christmas Red Velvet Poke Cake recipe makes perfectly juicy, tender, and flavorful steak every time! Serve with potatoes and a side salad for an unforgettable dinner in under 30 minutes.

Servings: 12 steaks
Christmas Red Velvet Poke Cake
Prep:20 minutes
Cook:25 minutes
Rest Time:10 mins
Total:45 minutes

Ingredients

Red Velvet Cake

Cheesecake Pudding Layer

Whipped Topping and Decorations

Instructions

1

Prepare the pan and batter

Preheat oven to 350°F and spray a 9x13-inch pan. In a bowl combine cake mix, water, oil, and eggs; beat 2 minutes until smooth. Pour into pan and smooth.

2

Bake until set

Bake on center rack for about 25 minutes or until a toothpick comes out with a few moist crumbs and edges pull slightly from the pan.

3

Poke holes and cool

Let cake rest 5 minutes, then use a rounded wooden spoon handle to poke holes 1/2 inch apart across the warm cake. Cool to room temperature.

4

Make and pour pudding

Whisk 3 3/4 cups cold whole milk with 6.8 oz cheesecake instant pudding for 1–1.5 minutes until it starts to thicken. Pour evenly over cake, smoothing gently.

5

Chill to set

Cover tightly and refrigerate at least 4 hours or overnight so pudding firms and the cake absorbs moisture for creamy pockets.

6

Tint whipped topping and decorate

Stir 10–12 drops green food coloring into 16 oz thawed whipped topping. Spread over chilled pudding, then top with 3 cups mini marshmallows, red and green M&M’s, and red sprinkles.

7

Slice and serve

Cut into twelve 3-inch x 3-inch squares using a sharp knife wiped between cuts for clean edges. Keep refrigerated until serving.

Last Step: Please leave a rating and comment letting us know how you liked this recipe! This helps our business to thrive and continue providing free, high-quality recipes for you.

Nutrition

Calories: 420kcal | Carbohydrates: 58g | Protein:
4g | Fat: 18g | Saturated Fat: 5g |
Polyunsaturated Fat: 4g | Monounsaturated Fat:
7g | Trans Fat: 1g | Cholesterol: 253mg | Sodium:
0mg | Potassium: 953mg | Fiber: 0g | Sugar:
0g | Vitamin A: 577IU | Vitamin C: 3mg | Calcium:
47mg | Iron: 6mg

Did You Make This?

Leave a comment & rating below or tag
@forkelle on social media!
Christmas Red Velvet Poke Cake

Categories:

Christmas Red Velvet Poke Cake

Did You Make This?

Leave a comment & rating below or tag @forkelle on social media!

Rate This Recipe

Share This Recipe

Enjoyed this recipe? Share it with friends and family, and don't forget to leave a review!

Comments (1)

Leave a Comment

0/1000 characters
Food Lover
1 day ago

This recipe looks amazing! Can't wait to try it.

Rating:

Comments are stored locally in your browser. Server comments are displayed alongside your local comments.

Family photo

Hi, I'm Abigail!

Chef and recipe creator specializing in delicious Sweet Treats cooking. Passionate about sharing easy-to-follow recipes that bring families together around the dinner table.

30-Minute Meals!

Join to receive our email series which contains a round-up of some of our quick and easy family favorite recipes.