
>>

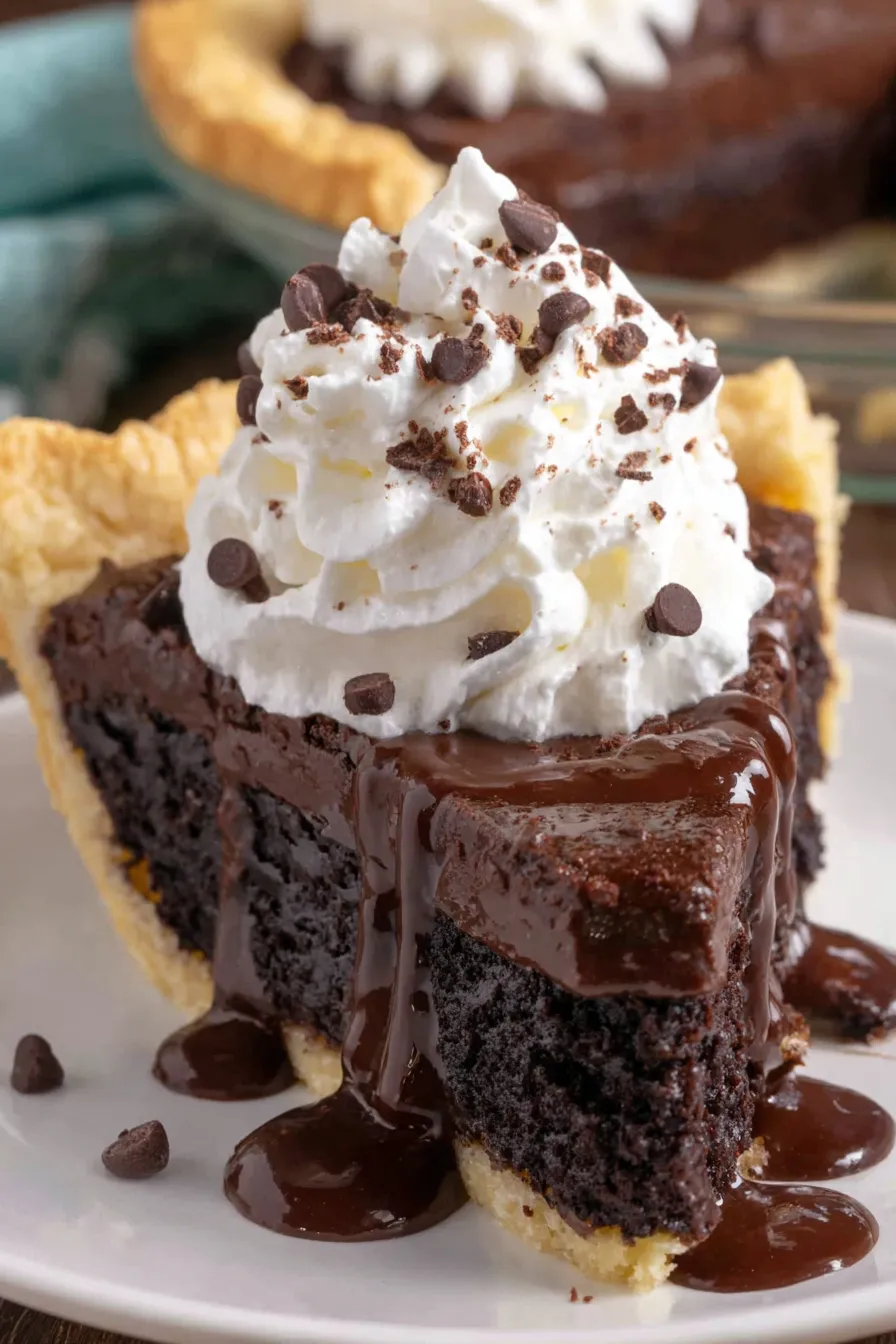
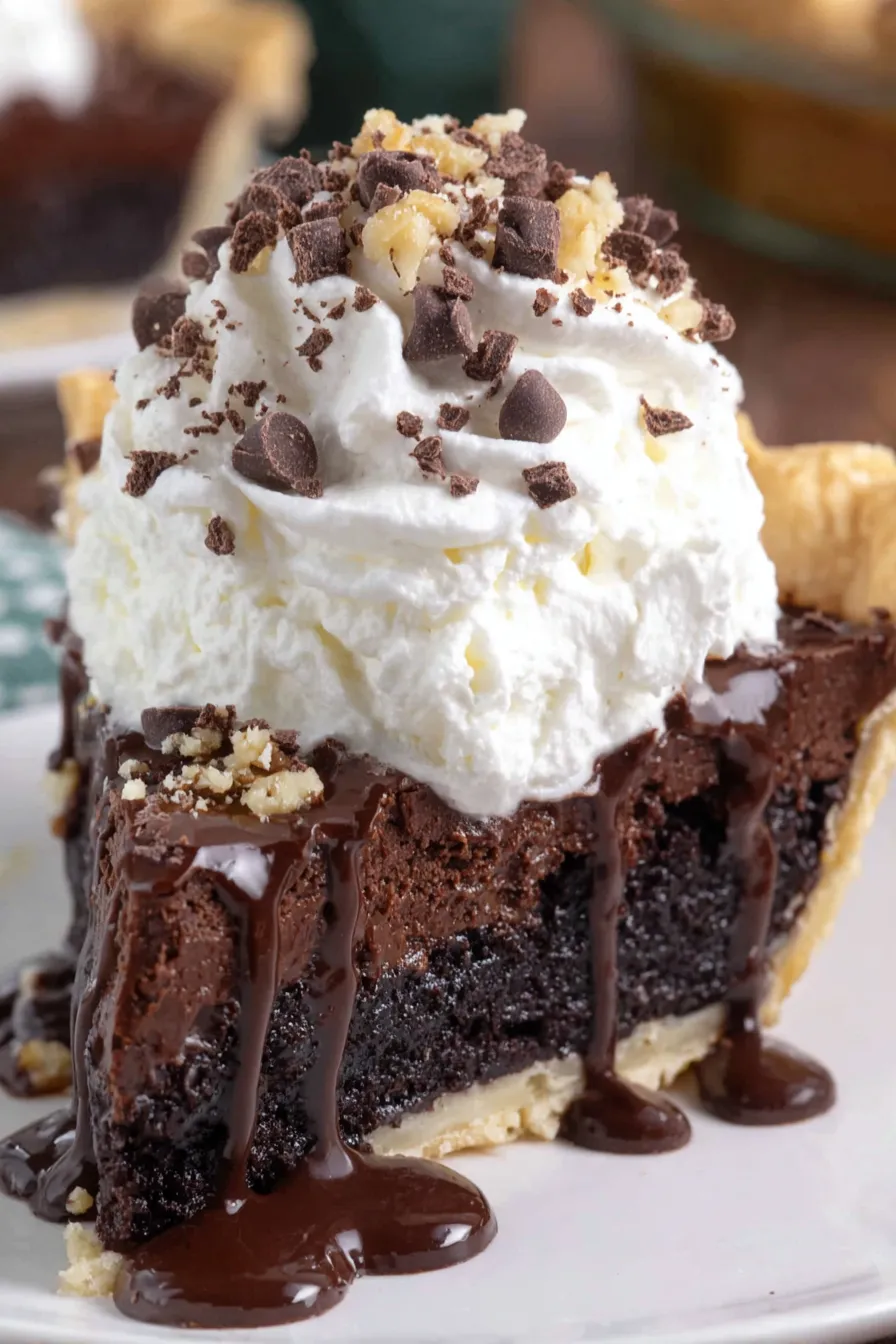
Fudgy, crackly-top brownie baked in a 9-inch frozen pie crust — a quick, crowd-pleasing dessert that serves warm with ice cream or chilled for a firm slice.

This brownie pie became my go-to when I needed something that felt decadent but did not demand a bakery schedule. I discovered this combination on a rainy Sunday when I had a frozen 9-inch pie shell in the freezer and pantry staples like cocoa, powdered sugar, and a few squares of chocolate. The result was a glossy, crackly-topped filling with a satisfying fudgy center that everyone called “the best brownie ever” while I felt cheekily proud that it came together in under an hour.
What makes this dessert special is the contrast between the crisp baked crust and the rich, brownie-like filling that sets beautifully but stays tender. The technique of combining hot melted butter and sugar gives the top that signature shiny, crackly finish you expect from a classic brownie, while the addition of powdered sugar and cocoa creates a smooth, glossy batter without complicated tempering. Whether you serve it slightly warm with a scoop of vanilla or chilled and carefully sliced for a party platter, it reliably disappears fast.
I first served this at a family movie night and watched it vanish. My aunt spooned a second helping straight from the pan, and my partner declared it “dangerously easy.” It’s become our quick celebration dessert when we want something indulgent but fuss-free.
My favorite thing about this pie is how forgiving it is. Once, I underbaked it by a few minutes and it still turned into a crowd-pleaser served warm with vanilla ice cream. The recipe survived a holiday rush and performed beautifully, which is why it’s now a staple for celebrations when I need an impressive but straightforward dessert.
Store leftover slices in an airtight container in the refrigerator for up to four days to preserve texture and flavor. To freeze, wrap the cooled whole pie or individual slices tightly in plastic wrap and then foil to prevent freezer burn; thaw overnight in the refrigerator before serving. To reheat a chilled slice, warm in a 325°F oven for 8 to 10 minutes or microwave briefly on medium power in 10-second bursts until just warm; adding ice cream right after reheating creates a delightful contrast between warm filling and cold topping.
If you prefer a less sweet dessert, use semisweet or dark chocolate chips and reduce granulated sugar to 2/3 cup. For a nut-free version omit walnuts or replace them with toasted sunflower seeds for crunch. To make the pie richer, swap 2 tablespoons of flour for 2 tablespoons extra cocoa powder and add 1 tablespoon espresso powder to intensify chocolate flavor. If you need a dairy-free approach, use a dairy-free margarine and dairy-free chocolate chips, but note the crust and texture will differ slightly.
Serve warm with a scoop of vanilla bean ice cream and a drizzle of chocolate sauce for a classic combination. For a refined presentation, dust the pie with a light coating of cocoa or powdered sugar and add a spoonful of lightly whipped cream and a few toasted walnut halves. This dessert also pairs well with salted caramel for an added sweet-salty contrast and is excellent alongside coffee or a dessert wine for dinner parties.
The concept blends two classic American treats: the brownie and the pie. Brownies originated in the United States in the late 19th century and became popular as a portable, chocolaty cake. Placing brownie batter into a pie shell is a modern, practical adaptation that delivers familiar brownie flavors in a format that is easy to slice and share. Regional variations often add nuts or swirl-ins such as cream cheese, but the straightforward version celebrates pure chocolate intensity.
In cooler months, serve warmed with spiced whipped cream or a drizzle of bourbon caramel for cozy comfort. During summer, top chilled slices with macerated berries or a scoop of lemon sorbet to cut richness. For holidays, fold peppermint chips into the batter or sprinkle crushed candy canes on top once slightly cooled for festive flair.
Make the filling ahead and store in the refrigerator up to 24 hours before pouring into the crust and baking; allow it to come to room temperature for 20 minutes before baking to maintain bake time accuracy. Bake the pie the day before an event, then chill and slice on the event day for clean presentations. Use disposable foil pans for easy transport when bringing to potlucks.
There’s something joyful about a dessert that looks decadent yet is straightforward to prepare. This brownie pie is a weeknight hero and a party favorite because it delivers chocolate satisfaction with minimal fuss. Try it once and I suspect it will find a place in your rotation like it did in mine.
Let the butter and sugar sit together for 5 minutes before whisking; this promotes a shiny, crackly top without extra beating.
Use a frozen unbaked pie shell straight from the freezer so the crust stays crisp when the filling bakes.
If you want cleaner slices, chill the pie completely before cutting; warmth yields a fudgier, softer slice.
To intensify chocolate flavor, add 1 tablespoon instant espresso powder to the dry ingredients.
This nourishing brownie pie recipe is sure to be a staple in your kitchen. Enjoy every moist, high protein slice — it is perfect for breakfast or as a wholesome snack any time.
Keep the pie covered in the refrigerator for up to 4 days. Freeze tightly wrapped for up to 3 months.
For a fudgier center, remove from the oven closer to 20 to 25 minutes after removing the foil. For a firmer, sliceable pie, bake toward the 30-minute mark uncovered.
This Brownie Pie recipe makes perfectly juicy, tender, and flavorful steak every time! Serve with potatoes and a side salad for an unforgettable dinner in under 30 minutes.
Preheat the oven to 350°F and place a rack in the lower third to promote even crust browning while the filling sets.
In a large bowl stir 3/4 cup granulated sugar into 8 tablespoons melted warm butter, let sit 5 minutes to start dissolving sugar, then whisk vigorously for 30 seconds.
Whisk in 1 large egg, 1 large egg yolk, 1 tablespoon water, and 1 1/2 teaspoons vanilla extract until combined, about 30 seconds.
Sprinkle 1/2 cup cocoa, 1/2 cup powdered sugar, 1/2 cup flour, and 1/4 teaspoon kosher salt over the wet mixture, then fold with a spatula until glossy and smooth.
Stir in 1/2 cup semisweet chocolate chips and 1/4 cup chopped walnuts if using; these create molten pockets and crunchy contrast.
Pour batter into the frozen 9-inch pie crust and smooth. Lightly spray foil with nonstick spray and tent over the pie, avoiding contact with the batter.
Bake covered for 25 minutes in the lower third of the oven. Remove foil and bake uncovered another 20 to 30 minutes; 20 to 25 minutes yields a fudgier center, 30 minutes makes it more set.
Cool on a wire rack. Serve slightly warm with ice cream or at room temperature. Chill for firmer slices before cutting.
Last Step: Please leave a rating and comment letting us know how you liked this recipe! This helps our business to thrive and continue providing free, high-quality recipes for you.
Leave a comment & rating below or tag
@forkelle on social media!

Thick, fudgy chocolate chunk brownies crowned with gooey mini marshmallows and a quick-set chocolate frosting for an irresistible, crowd-pleasing treat.

Buttery shortbread meets a gooey, brown-sugar pecan topping in these quick pecan pie bars. Just 10 minutes to prep and perfect for sharing.

Silky, crack-free pumpkin cheesecake with warm spice, buttery graham crust, and optional caramel and rum-kissed whipped cream. Your effortless holiday showstopper.
Leave a comment & rating below or tag @forkelle on social media!
Enjoyed this recipe? Share it with friends and family, and don't forget to leave a review!
This recipe looks amazing! Can't wait to try it.
Comments are stored locally in your browser. Server comments are displayed alongside your local comments.

Join to receive our email series which contains a round-up of some of our quick and easy family favorite recipes.
